
Who can do what
The table below outlines role capabilities across the Bilaro procurement workflow. Permissions are strictly enforced by the system based on active user roles:
| Capability / Action | Global Admin | Admin | Director | Finance | Manager | Requester | Receiver |
|---|---|---|---|---|---|---|---|
| Create purchase request | Yes | Yes | Yes | Yes | Yes | Yes | No |
| Approve request (within threshold) | Yes | Yes | Yes | No | Yes | No | No |
| Approve request (above threshold) | Yes | No | Yes | No | No | No | No |
| Issue purchase order (PO)* | Yes | Yes | No | Yes | No | No | No |
| Submit payment request / record payment | Yes | Yes | No | Yes | No | No | No |
| Submit petty cash claim | Yes | Yes | Yes | Yes | Yes | Yes | No |
| Approve petty cash claim | Yes | Yes | Yes | No | Yes | No | No |
| Disburse petty cash claim | Yes | Yes | No | Yes | No | No | No |
| Create and manage RFQs | Yes | Yes | Yes | Yes | Yes | No | No |
| Award RFQ contract | Yes | Yes | No | Yes | Yes | No | No |
| Receive goods / record delivery receipts | Yes | Yes | Yes | Yes | Yes | Yes | Yes |
| Invite users and provision accounts | Yes | Yes** | No | No | No | No | No |
| Authorise user account deletion | Yes | No | Yes | No | No | No | No |
| Configure company settings and thresholds | Yes | Yes | No | No | No | No | No |
| Manage departments and projects | Yes | Yes | No | No | No | No | No |
| Allocate department budgets | Yes | Yes | No | No | No | No | No |
| Register vendors and run bulk imports | Yes | Yes | No | No | No | No | No |
| Track contracts and expiry alerts | Yes | Yes | No | No | No | No | No |
| Inspect audit log | Yes | Yes | No | No | No | No | No |
| Manage multi-company access | Yes | No | No | No | No | No | No |
| View billing and subscription status | Yes | Yes | Yes | Yes | Yes | No | No |
* Subject to company four-eyes policy: by default, the user who approved a purchase request cannot issue its purchase order. ** Admins can assign Requester, Receiver, Manager, and Finance roles. Only Global Admins can assign Director or Admin roles.
How to complete first-time company setup
- If you are creating a new company organisation, navigate to the setup wizard (
/setup-companyor/onboarding). - In the company profile step, enter your official entity information:
- Company Name: Your registered corporate or trading name.
- Company registration number: Your SSM registration number.
- Contact Person: Primary company administrator name.
- Contact Number: Primary administrative telephone number.
- Email Address: Official billing or administrative email.
- Trading license number: Local council or trade license number (if applicable).
- In the business classification step, search and select up to three Malaysia Standard Industrial Classification (MSIC) codes representing your primary business activities.
- Enter your operational parameters (approximate monthly approvals, approver team size, and current procurement method).
- Complete the setup wizard. Bilaro initializes your workspace and transitions through
/onboarding/finishingto activate your company instance.
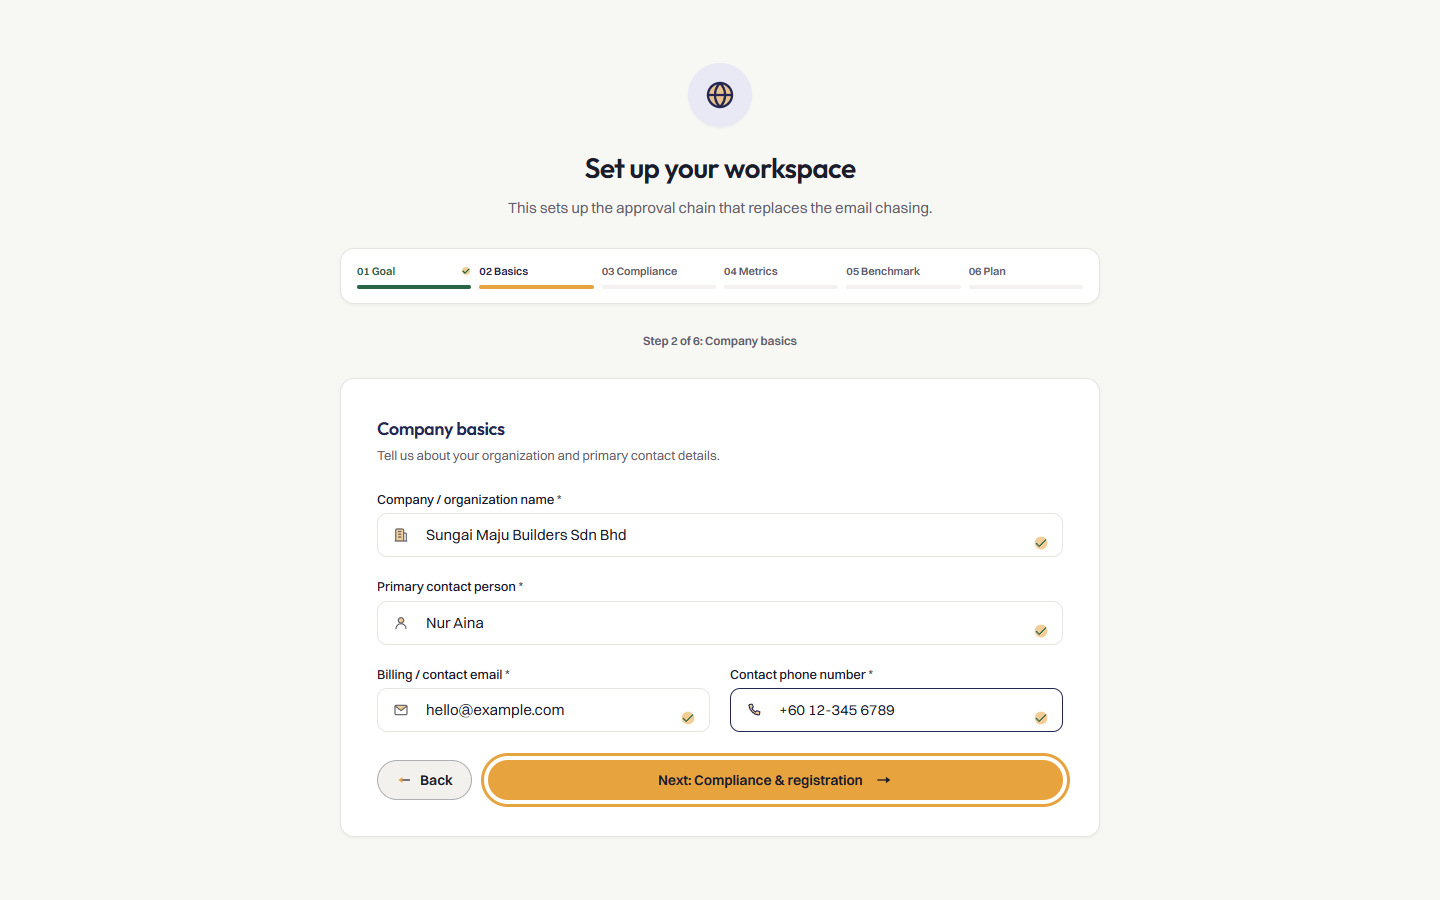
Note: You can update company profile information, business objectives, and registration details at any time under Settings in the sidebar.
How to configure company settings and approval limits
- Open Company Settings from the sidebar.
- In the Company profile section, upload your official logo by clicking Change logo (PNG or JPG format, maximum 2 MB). Your logo appears automatically on all generated Purchase Orders.
- Review and update your official timezone (default is
Asia/KuchingorAsia/Kuala_Lumpur). - Scroll to the Financial settings section:
- Director approval threshold (RM): Enter the monetary value above which requests require Director approval (default is RM 5,000.00). Requests below or equal to this limit require Manager review only.
- Tax rate (%) and Tax label: Configure your local tax parameters (for example, 6% or 8% SST).
- Invoice match tolerance (%): Set the allowed percentage variance (between 0% and 20%) between purchase order totals and received invoice totals.
- Daily petty cash limit (RM): Set your company petty cash cap (default is RM 5,000.00).
- In the Policy Settings section:
- A different person must issue the PO: Keep this enabled to ensure the person who approved a request cannot issue its purchase order. If disabled, a confirmation modal explains the audit implications.
- Enforce Delivery Order (DO) scan upload: Toggle whether receiving staff must upload a physical Delivery Order scan when recording goods receipts.
- When a request goes over budget: Select Standard (displays budget warnings during review) or Strict (blocks approval if a request exceeds department budget limits).
- In the Purchase Order Settings section:
- Signature block: Choose Wet-ink (default), Hidden (fully digital), or Stored digital signature.
- Show approval status chip: Toggle whether the green digital approval chip displays on generated PO PDFs.
- Standard terms and conditions: Enter standard legal terms and payment conditions printed on the second page of your generated purchase orders.
- Click Update financials or Save PO settings to apply your changes.
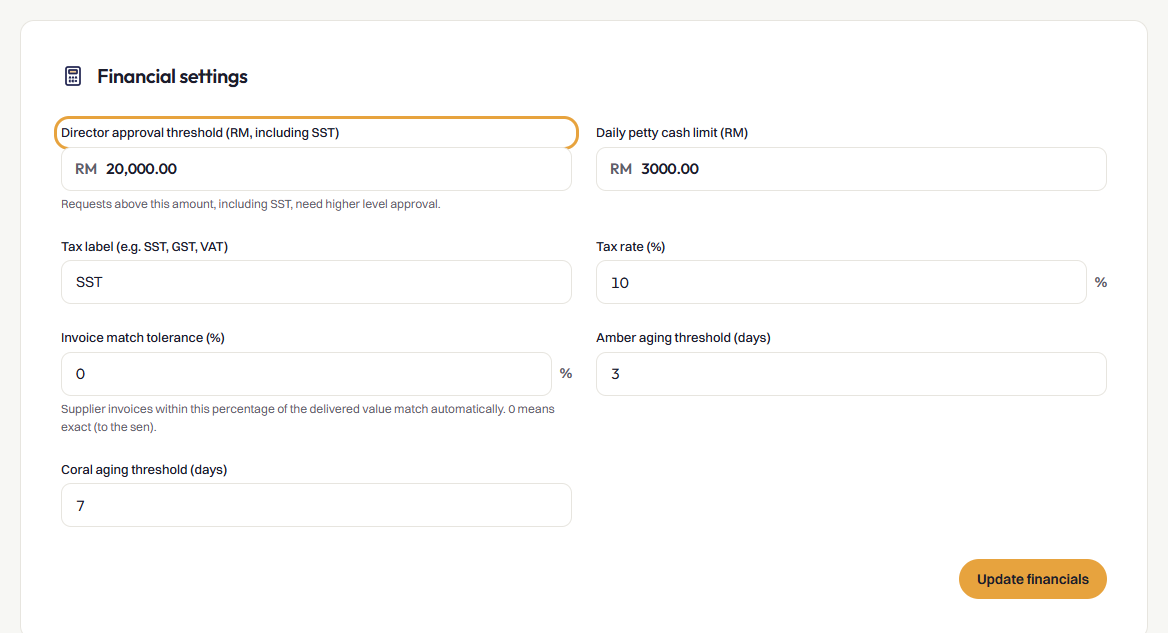
Tip: Changes to sensitive financial controls, such as four-eyes verification, are logged in the company audit trail with the administrator's name and timestamp.
How to set the quotation policy
- Open Company Settings from the sidebar.
- Scroll to the Quotation policy section.
- Tick Require quotations before a purchase to activate policy checks.
- In Threshold (RM), enter the minimum purchase sum that requires competitive quotes (leave blank to enforce the policy on every standard purchase request).
- In Minimum quotes, enter the number of quotes required (between 1 and 10, default is 3).
- Under When there are fewer quotes than the minimum, choose how the system handles exceptions:
- Select Allow with an exception and flag the request to permit submission with an explanatory note while flagging the request during review.
- Select Allow with an exception and send the request to a Director to route any request with an exception directly to a Director for sign-off.
- Click Save quotation policy.
Note: To prevent unilateral alterations, saving a change to an active quotation policy places it into Pending Director approval status. The current policy remains in force until another Director reviews and approves the proposed change. Directors can review the comparison table under Pending Director approval and click Approve or Reject, while the proposer can click Withdraw. Note: When a purchase request is submitted with fewer quotes than the policy requires, the requester must record an exception reason (Sole source, Emergency, Framework contract, or Other) and provide an explanatory note. Approvers must review this justification and tick a mandatory acknowledgement checkbox before the request can be approved. Note: Quotations submitted in foreign currencies are converted to Malaysian Ringgit using official daily rates from Bank Negara Malaysia. Users can also select Enter my own rate and provide an explanation note if a fixed contract rate applies. Tip: To export quotation compliance records for internal audit or tax reporting, select dates in From and To under Quotation evidence and click Download CSV.
How to turn on the Director approvals queue
- Open Company Settings from the sidebar.
- Scroll to the Director approvals queue section.
- Under New requests in the Director queue, select your organisation's preference:
- Select Always: list new requests as well as those waiting for a Director to display newly submitted requests directly in the Director's pending queue alongside requests awaiting secondary Director approval. This enables Directors to approve initial submissions before or alongside the Manager review step.
- Select Only when the company has no active Manager to restrict new submissions to the Manager queue, routing them to Directors only when the purchase exceeds the manager threshold or if the company has no active Manager accounts.
- Click Save Director queue setting.
Note: Only Admins and Global Admins can modify the Director queue setting. In companies operating without active Managers, Bilaro automatically applies the solo-Director fastpath regardless of queue visibility.
How to limit who can open payroll and loan requests
- Open Company Settings from the sidebar.
- Scroll down to the Purchase order settings section.
- Locate the setting Limit who can open payroll and loan requests.
- Tick the checkbox to activate the access restriction (or untick to allow standard viewing).
- The setting saves automatically.
Note: When enabled, only users with the Admin, Global Admin, Director, or Finance role, the user who created the request, and designated approvers can view or open requests categorised under Payroll (total) or Loan instalment. For all other users, these requests are hidden from search results, request boards, and calendar listings; opening one directly shows it as not found. Aggregate spend totals on the overview dashboard and spend analytics are not altered.
How to allow title edits after approval
- Open Company Settings from the sidebar.
- Under the policy controls section, locate Allow title edits after approval.
- Tick the checkbox to permit title amendments on approved records (or untick to prevent post-approval edits).
- Click Save policy settings.
Note: Before approval (while a request remains in Draft or Submitted status), both the original request creator and users with the Admin or Global Admin role can edit the request title at any time. Once a request reaches Approved, PO Issued, Payment Pending, or Paid status, title edits are restricted strictly to Admins and Global Admins, and can only occur if Allow title edits after approval is switched on. Requesters cannot amend titles on approved orders.
Optional modules
Bilaro includes optional modules that can be enabled to match your organisation's workflow. Bilaro support switches modules on or off for a company.
- Cost codes: Allocate purchase request lines to commercial or accounting cost codes and track expenditure in the Project Costs Guide.
- Bill of Quantities: Track construction project commitments against bill allowances, import BQ spreadsheets, and configure unit conversions in the Project Costs Guide.
- Inventory: Track stock levels across central stores and site yards, manage stock items, and record movements in the Inventory Guide.
- Procurement planning: Plan what a project or period will buy, get the plan approved, raise requests and RFQs from it, and compare it with actual orders in the Procurement Planning Guide.
- Petty cash: Submit, approve, and disburse petty cash claims with daily and monthly limits in the Finance Guide.
- Contracts: Record vendor agreements, values, and expiry alerts in the Administrator Guide.
- RFQ: Run competitive requests for quotation, compare supplier bids, and award purchase requests in the Request for Quotation (RFQ) Guide.
- Savings report: Measure procurement savings against preset benchmarks or competing quotes across projects and items in the Project Costs Guide.
- Supplier reviews: Evaluate vendor performance across quality, delivery, price, and service, and view goods receipt delivery metrics in the Recurring Payments, Calendar, and Supplier Reviews Guide.
- Group sourcing: Consolidate multi-subsidiary requisitions, run group tenders, and allocate awards across companies in the Group Features Guide.
How to invite users and assign roles
- Open Team Management from the sidebar (
/users). - The page opens to the Directory tab, displaying active, pending, and suspended users along with current seat usage.
- Click the Provisioning hub tab.
- Enter the user details:
- Full Name: The teammate's legal name.
- Email Address: Corporate email address (used for signing in).
- Job title / position: The user's operational position.
- Phone number: Contact phone number for notifications and WhatsApp routing.
- Under Assign role(s) & permissions (select multiple), select one or more roles:
- Requester: Creates purchase requests and submits petty cash claims.
- Receiver: Inspects deliveries, records goods received, and uploads delivery orders.
- Manager: Reviews and approves requests up to the company threshold.
- Finance: Issues purchase orders, processes disbursements, and records payments.
- Director: Approves high-value requests above the approval threshold. (Only Global Admins can assign this role).
- Admin: Configures settings, manages users, and oversees company policies. (Only Global Admins can assign this role).
- Click Provision user. The user is created with a temporary default password (
password123) and prompted to set their credentials.
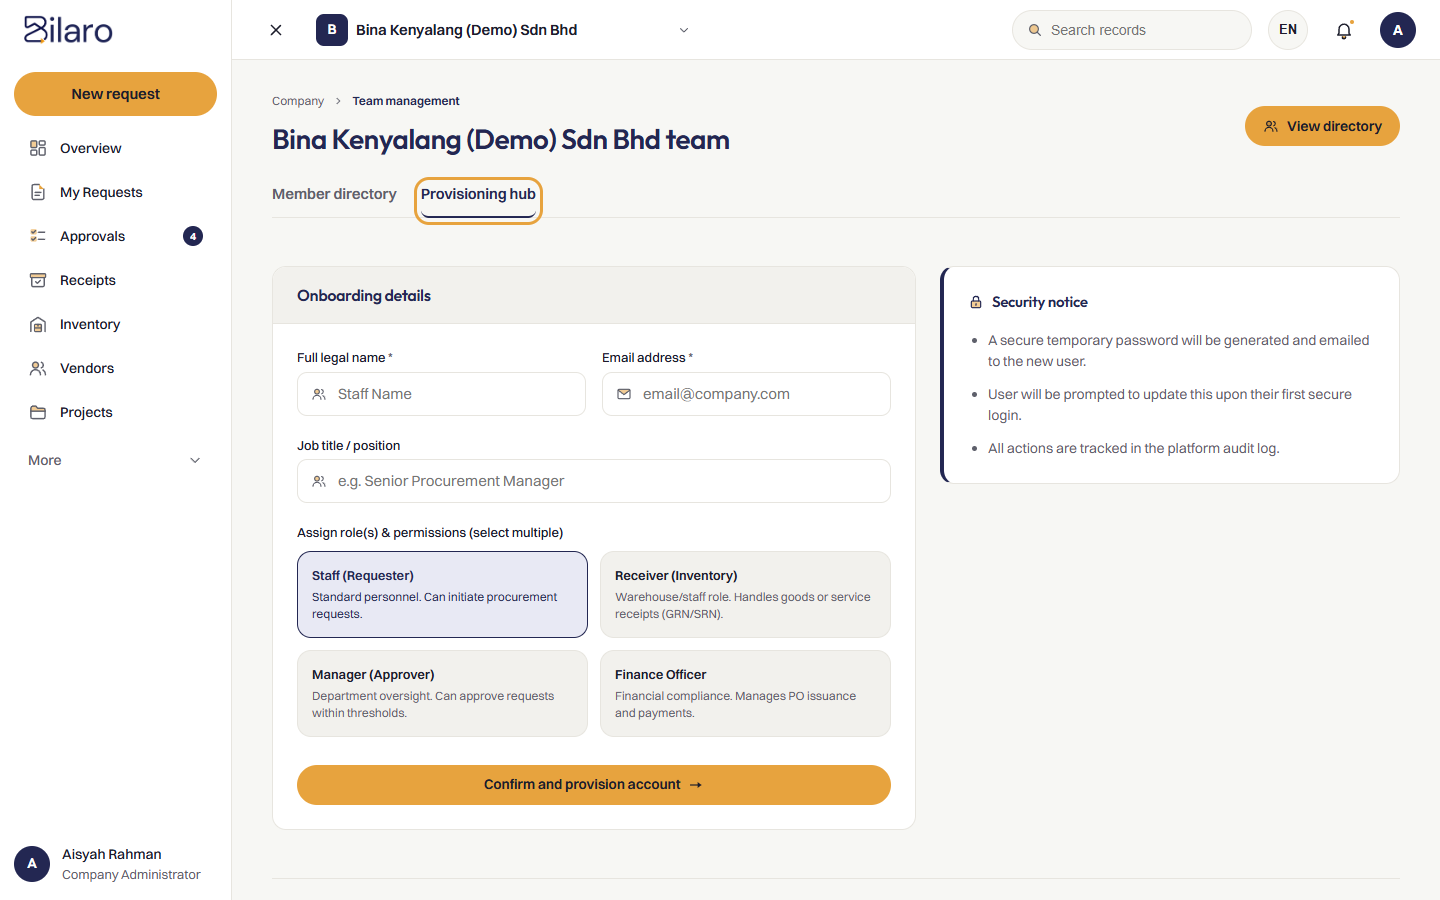
Note: To remove or delete a user account, click Delete in the user directory. Deleting an account initiates a deletion request that requires Director approval before the account is purged.
How to manage users across multiple companies
- In the Team Management directory, locate the user who needs access to multiple corporate entities.
- In the actions menu for that user, click Manage companies.
- A modal opens listing the companies currently assigned to that user.
- To grant access to an additional company, select the entity under Add company and click Add.
- To revoke access to a specific company, locate the company row under Assigned companies and click Remove.
- Click Close when finished.
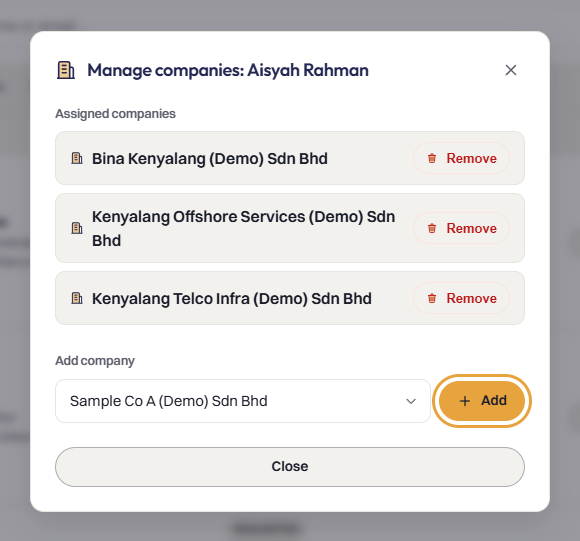
Note: Multi-company management is restricted to Global Admins.
How to manage departments
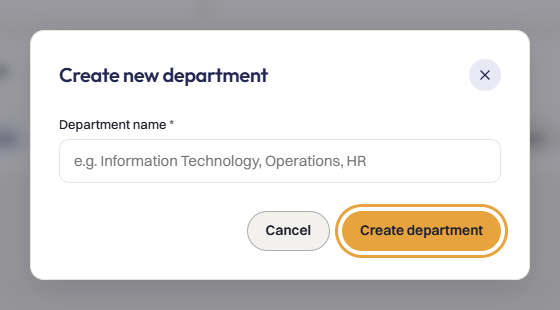
- Open Departments from the sidebar (
/departments). - The page displays all active departments along with their assigned member counts and active budget statuses.
- To add a department, click New department.
- In the dialog, enter the department name in Department name (for example,
Operations,Site Engineering, orFinance). - Click Create department.
- To edit a department name or review its assigned staff, click on the department card and select Edit.
- To remove an unused department, click Archive (or Delete permanently if already archived) and confirm the prompt.
Tip: Departments help organize budget allocations and track organizational spend in Analytics.
How to manage projects
- Open Projects from the sidebar (
/projects). - Review the list of active and archived projects. Each card displays the project code, client name, contract value, and timeline.
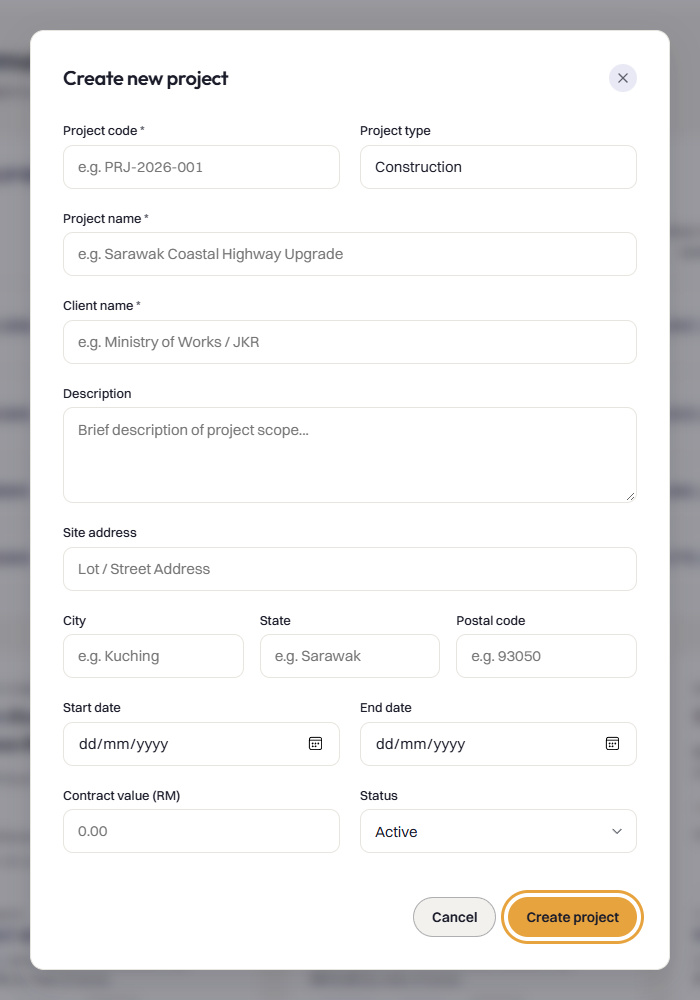
- Click New project to register a project or client site.
- Fill in the project details:
- Project Code: A unique internal identifier (for example,
PRJ-2026-01). - Project Name: The descriptive title of the project.
- Client name: Name of the client or developer.
- Project type: Select the project category (for example, Construction, Maintenance, or Supply).
- Site address, City, State, and Postal code: Delivery and physical site location.
- Start Date and End date: Project operational period.
- Contract value (RM): Total project budget or contract sum.
- Project Code: A unique internal identifier (for example,
- Click Create project.
- When team members raise purchase requests, they can tag line items directly to this project for cost tracking and site deliveries.
Tip: When a project reaches completion, open the project details and update the status to Completed or Archived to keep request dropdowns uncluttered.
How to configure department budgets
- Open Budgets from the sidebar (
/budgets). - Select the Fiscal year and optionally select a specific month or leave as Annual.
- Review the budget overview table, which lists each department, its allocated budget amount, committed spend (approved requests and issued POs), and remaining balance.
- To set or adjust a department budget, click Set budget or Edit next to the department name.
- In the modal, confirm the department and enter the monetary limit in Allocated amount (RM).
- Click Save changes.
- To remove a budget allocation, click Delete next to the department row and confirm.
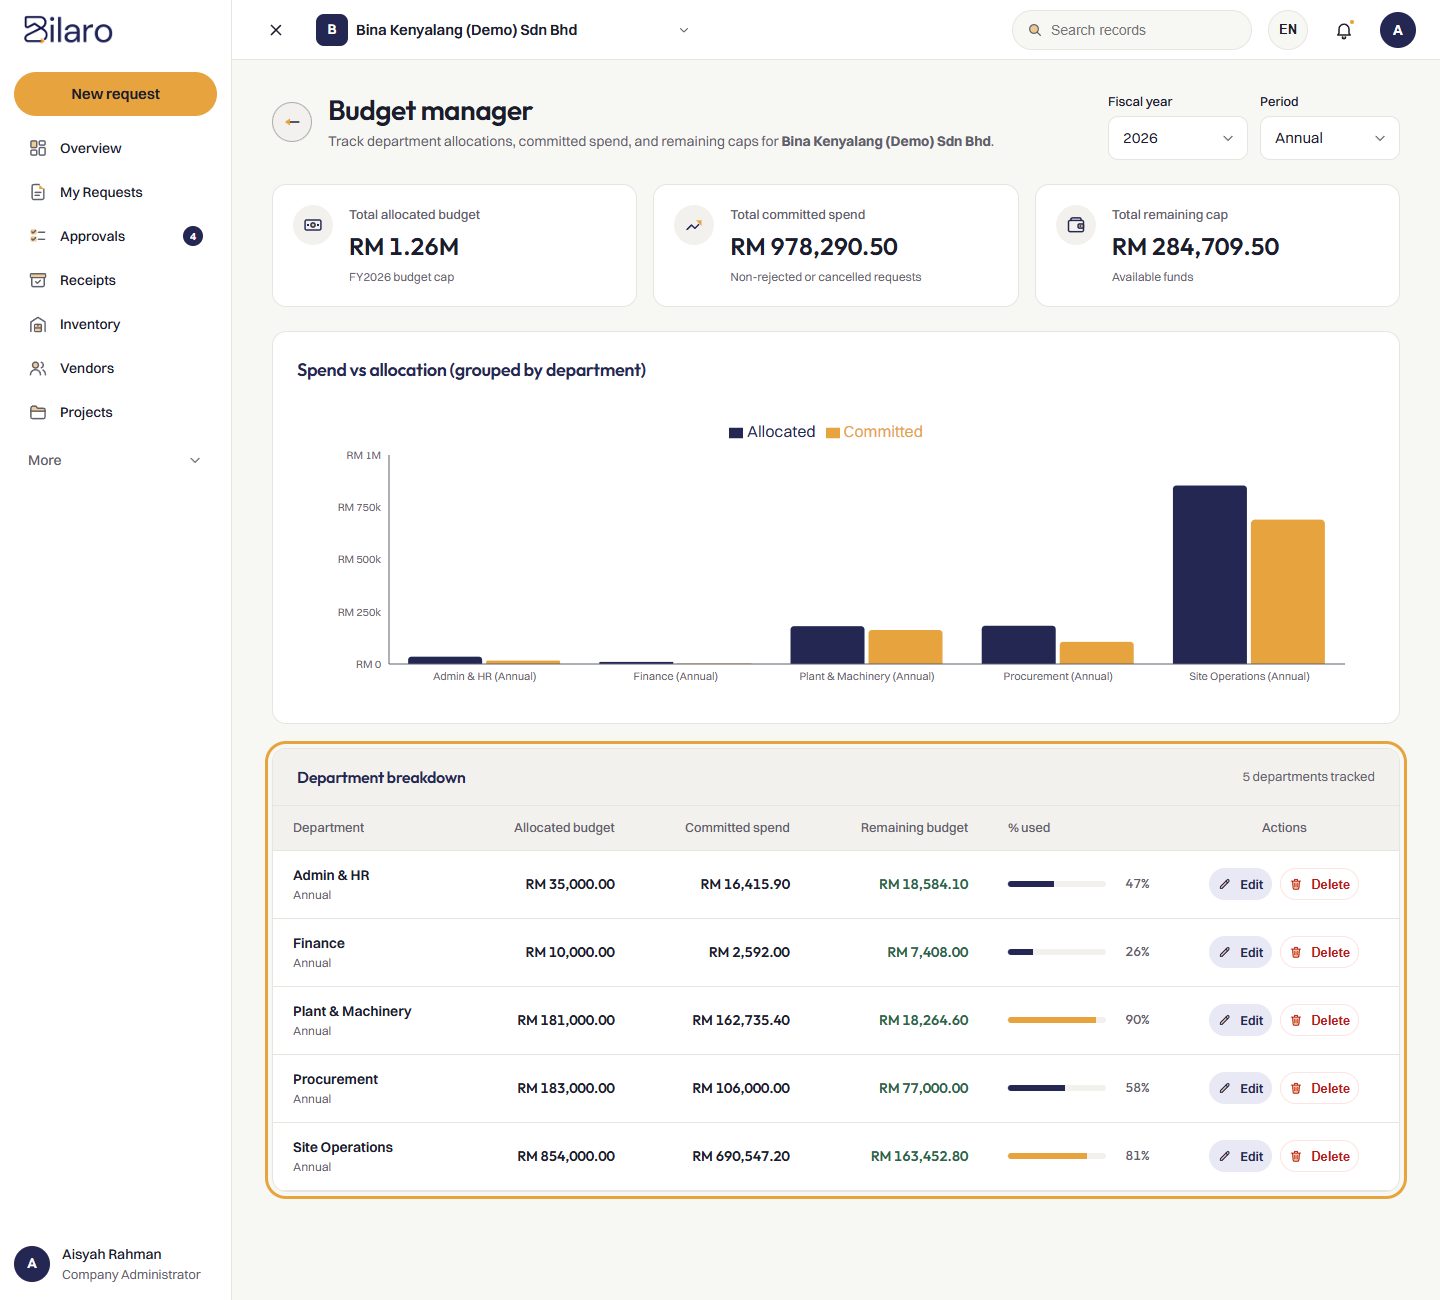
Note: If your company budget policy in Settings is set to Strict, purchase requests that exceed the allocated amount cannot be approved until you increase the budget limit.
How to manage the vendor register and bulk import
- Open Vendors from the sidebar (
/vendors). - Review the registered suppliers, searchable by name, category, or city.
- To add a single supplier, click Register vendor:
- Enter the legal vendor name, contact person, phone number, email address, physical address, and bank account information.
- Click Register vendor.
- To import a large list of vendors from a spreadsheet:
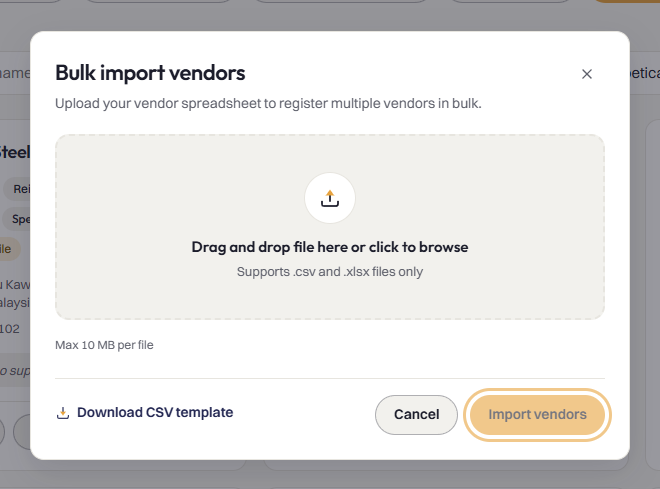
- Click Import vendors.
- Download the provided template CSV file.
- Populate the template with your vendor records (columns include Name, Category, Address, Contact Number, and Rating).
- Drag or upload your completed CSV file into the modal.
- Click Import vendors to complete the import.
- To export your vendor database for auditing or accounting reconciliation, click Export CSV.
Tip: Click Re-scan categories if you have imported multiple unassigned vendors and want Bilaro to automatically assign standardized category tags based on vendor names.
How to manage contracts and track expiry alerts
- Open Contracts from the sidebar (
/contracts). - The page displays all active vendor service agreements, leases, and procurement contracts.
- Click + Add Contract to record a new agreement:
- Enter the Contract title and Contract No.
- Select the associated supplier from the Vendor dropdown.
- Enter the Start date and Expiry date.
- Enter the total contract value in Value (RM).
- Attach the signed contract PDF by clicking the file upload input.
- Click SAVE CONTRACT.
- To inspect agreements nearing renewal, click the ⚠ Expiring ≤30 days filter tag or filter by status (Active, Expired, or Terminated).
- Click on any contract to view details, replace the uploaded document, or update renewal terms.
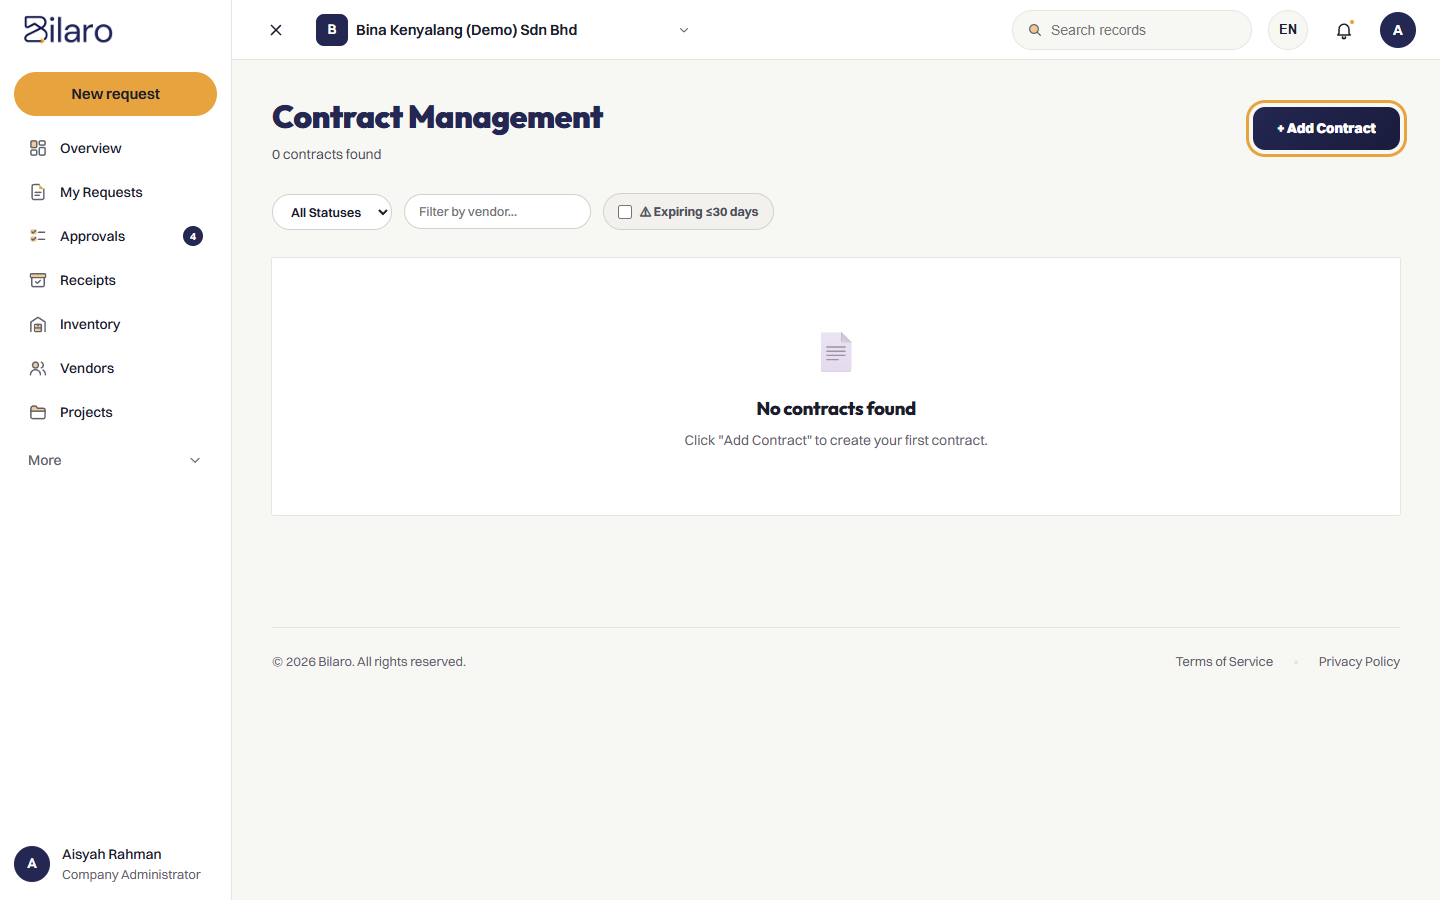
Tip: The dashboard and contracts page automatically highlight contracts expiring within 30 days with a warning badge so your team can negotiate renewals in advance.
How to inspect the company audit log
- Open Audit Log from the sidebar (
/audit-logs). - The audit trail displays an immutable record of all key operational actions across your company.
- Filter the log entries using the controls at the top:
- Date range: Specify a start date in From date and an end date in To date.
- User: Search by the name of the user who performed the action.
- Action: Search by action type (such as
REQUEST_APPROVED,PO_ISSUED,PAYMENT_RECORDED, orSETTINGS_UPDATED). - If you are a Global Admin, use the Company selector to inspect logs across different tenant companies.
- Review the table columns: Timestamp, User, Role, Action, Status transition, and IP address.
- To export the log for external compliance or auditing, click Export CSV or Download PDF.
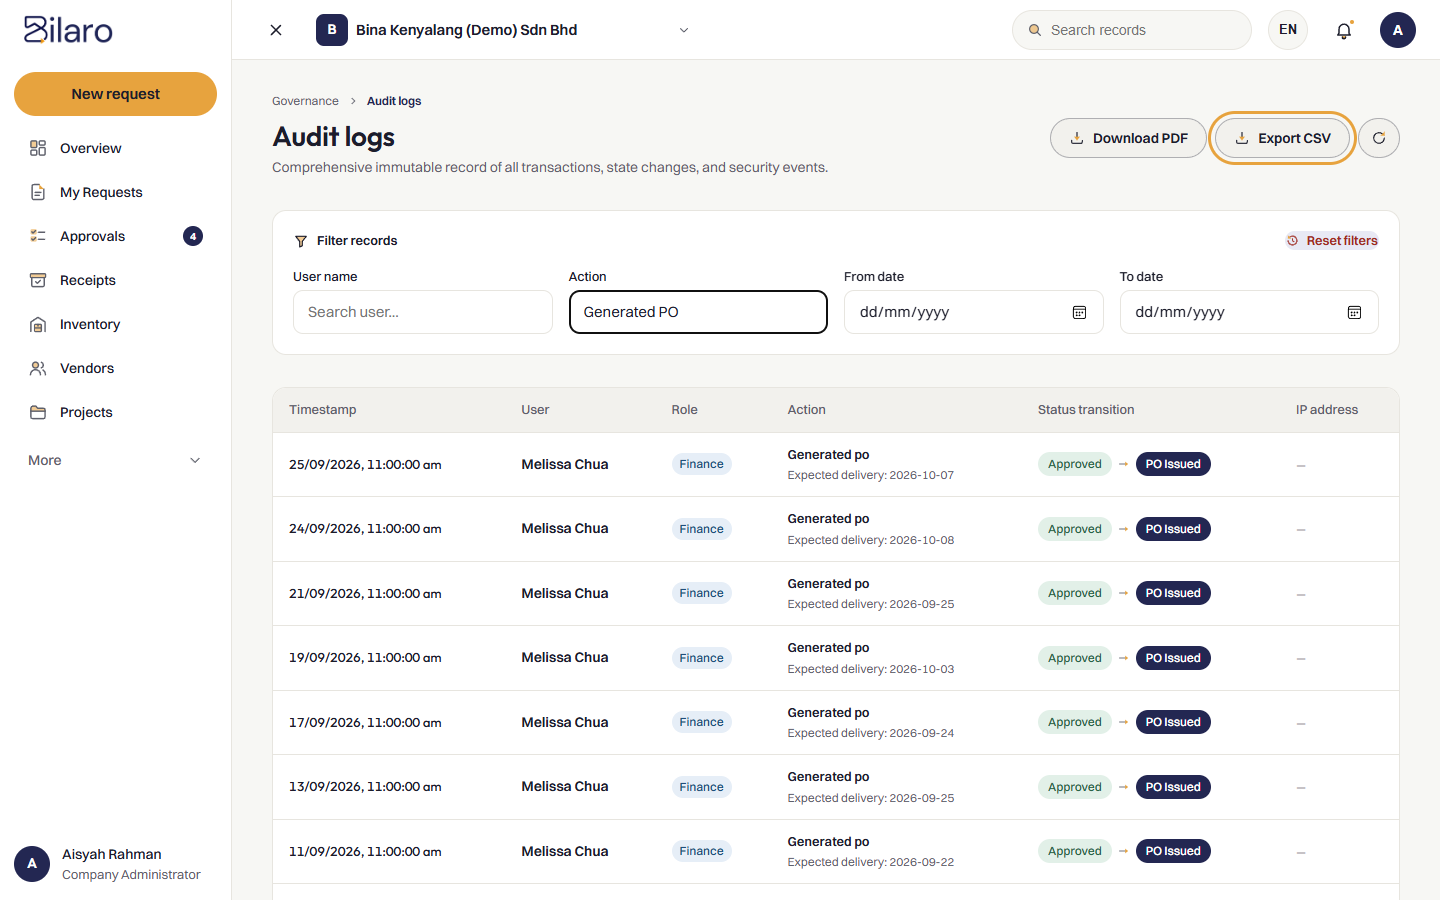
Note: Audit log records cannot be edited or deleted by any user, ensuring complete data integrity.
How to view billing and subscription status
- Open Billing from the sidebar (
/billing). - Review the Current plan card:
- Displays your active plan tier (Core, Pro or Trial).
- Displays your billing interval (Monthly or Annual) and renewal date.
- Shows the active subscription status badge.
- Review the Seat usage counter:
- Shows the number of assigned user seats versus your plan capacity.
- If your active users approach or reach plan limits, a warning indicator prompts you to adjust your seating.
- To view previous subscription invoices, download tax receipts, or update your company credit card, click Manage billing to open the secure Stripe billing portal.
- To change your plan or unlock additional features (such as advanced Spend Analytics), click Upgrade to Pro.
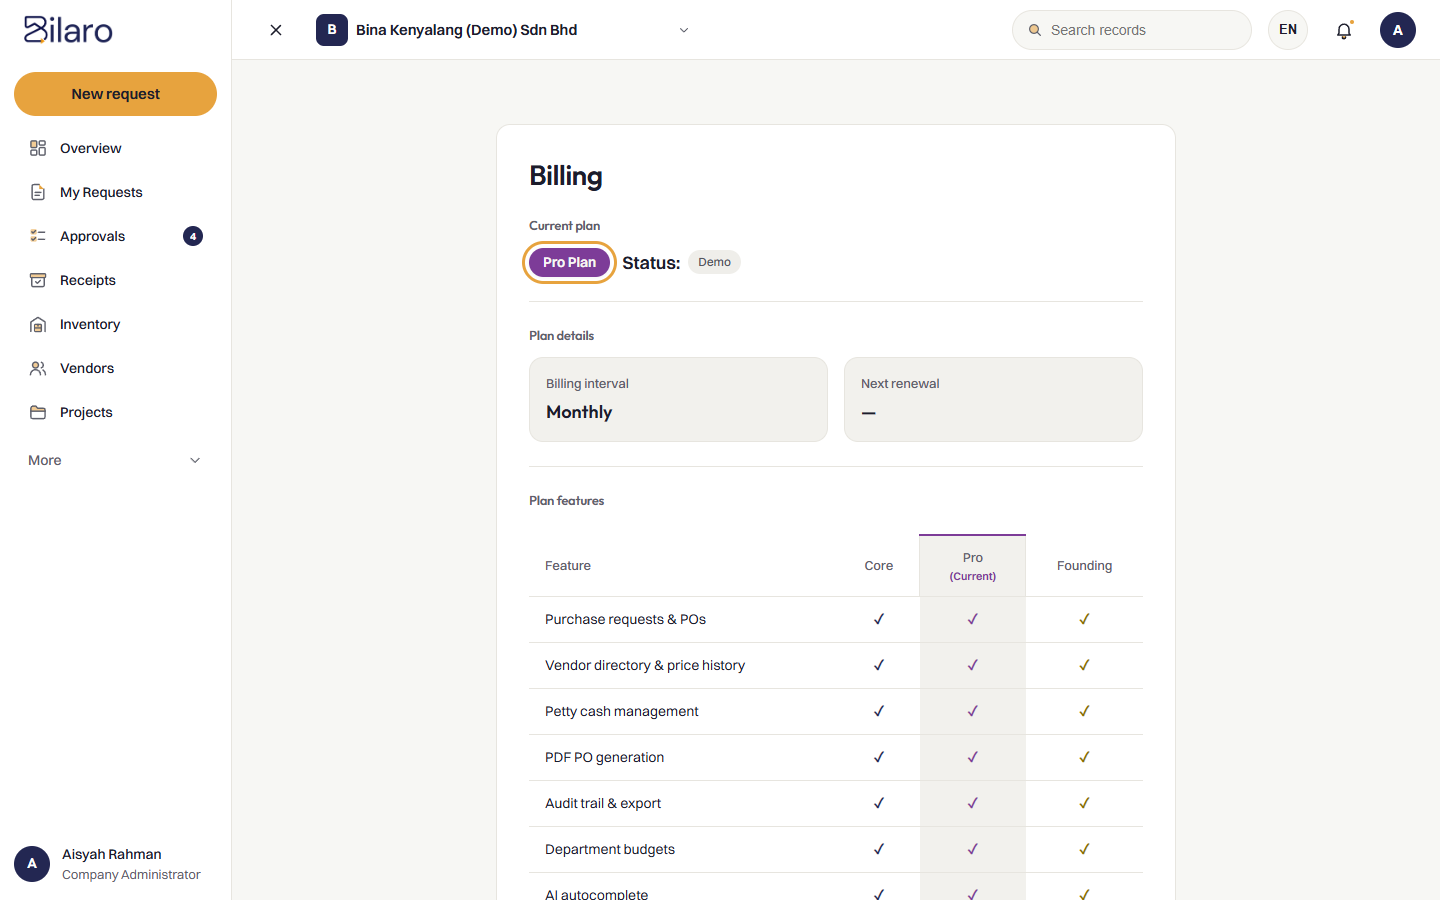
Note: Only users with management, finance, or administrative roles can view the billing overview. Account billing changes can only be performed by Admins and Global Admins.
How to close a company
- Open Company Settings from the sidebar (
/admin-settings). - Scroll to the bottom of the page to locate the Close this company card.
- Review the closure notice. Closing a company immediately stops all members from signing in and locks company records.
- In the confirmation input under Type the company name to confirm: [company name], type your company's exact registered name as displayed.
- Tick the mandatory checkbox I understand. The Close this company button remains disabled until both the exact company name is typed and the acknowledgement checkbox is ticked.
- Click Close this company. The button displays Closing... while processing.
- Once processed, a confirmation notice confirms the closure: "The company is closed. We will email you a link to download a copy of your records. That copy is yours to keep. Bilaro deletes your records from its systems 30 days after we send you the link. You will be signed out in a moment." You are automatically signed out within five seconds.
Note: Closing a company can only be performed by users holding the company Admin role. Platform staff (Global Admin) delete companies through the platform console rather than this self-closure card. Note: Before a company can be closed, several prerequisite checks must pass:
- The company must not have an active Stripe subscription. Any ongoing subscription must be cancelled first in Billing.
- The company must not have affiliate commission records on file. If commissions exist, contact Bilaro support.
- The company must not have purchase requests pooled in an active group RFQ. Pooled requests must be released or the group RFQ cancelled first.
- The company must not be a billing parent whose subscription covers other subsidiary companies. Covered companies must be closed or moved first. Note: When a company is closed, all records are immediately locked and hidden from view. Nothing is deleted immediately. Bilaro automatically prepares a comprehensive data export zip in the background containing:
- CSV files for every kind of record (requests, purchase orders, payments, receipts, supplier invoices, vendors, contracts, RFQs, projects, bills of quantities, inventory, departments, budgets, petty cash, audit logs, and users).
- Re-created PDF documents for every purchase order issued and every goods or service receipt confirmed.
- All uploaded files (quotations, delivery orders, invoices, contracts, receipts) in a
files/directory, along with afiles_manifest.csv. - (Supplier bank details, account passwords, platform billing details, and internal download tokens are excluded).
Note: Once the export is ready, Bilaro emails the administrator who initiated the closure a private, authenticated link to the Your closed company portal (
/closed-company#<token>). On this portal, the administrator can click Download my records to save the archive for their organisation's statutory record-keeping. Note: Records are kept locked in Bilaro for 30 days after the export link email is sent (the handover). On the 30th day, Bilaro deletes company records from its systems. Immutable audit trail logs are retained permanently. Note: Company closure cannot be undone by the user ("This cannot be undone by you"). If a closure was performed in error, the company administrator must contact Bilaro support immediately before the 30-day retention period elapses. Note: Closing the company terminates user sessions immediately. When users whose only company has closed attempt to sign in, they receive the access error"Your company has been closed.", while active session requests return"This company has been closed."Users who belong to other active companies or company groups can continue to sign in and switch to their remaining companies. If the closed entity was covered by a parent company's subscription, the parent company's active administrators receive an in-app alert and email notification that the company has closed.
Need more help? Email support@bilaro.my.