
What is project cost tracking for?
Project cost controls help companies monitor construction and operational expenditure against contracted budgets, commercial cost codes, and negotiated supplier savings. They prevent budget overruns by checking purchase request quantities and prices against pre-approved Bill of Quantities allowances before orders are issued. For example, when a site project orders 50 tonnes of high-tensile steel rebar, Bilaro converts bar lengths into tonnes, tags the expenditure to a structural rebar cost code, verifies that the purchase stays within the project's BQ allowance, and records the savings achieved against competing quotes.
How to set up cost codes
- Open Company Settings from the sidebar (
/admin-settings). If you do not see Company Settings in the sidebar, you need an Admin or Global Admin role. - Scroll down to the Cost codes section. If you do not see Cost codes in Company Settings, your company does not have this module; ask your Admin or Bilaro support.
- In the cost codes form, enter the accounting or cost-allocation identifier in Code (for example,
CAPEX-01orSITE-01). - Enter an optional explanatory title in Description (for example,
Structural Steel & Rebar). - Click Add cost code. The new code appears in the active codes table.
- To modify an existing code or description, click Edit on that code's row, adjust the fields, and click Save.
- To retire a code from purchase request pickers, click Archive. To view or reactivate retired codes, tick Show archived codes and click Restore.
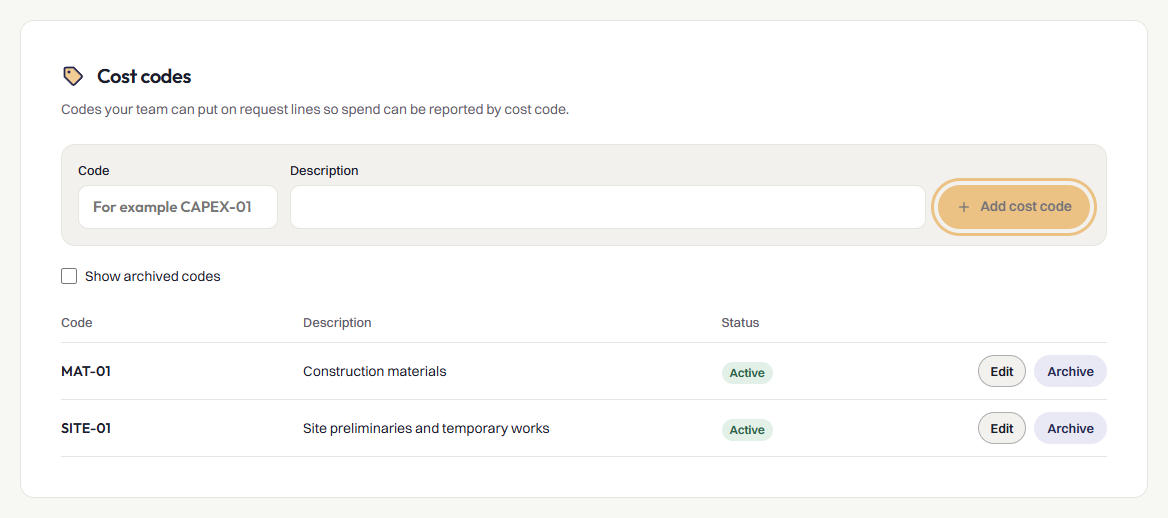
Note: Only Admins and Global Admins can create, edit, archive, or restore cost codes. Codes must be unique within your company (case-insensitive). Existing purchase requests that already use an archived code retain their historical link.
How to tag request lines to cost codes
- Click New request at the top of the sidebar (or open an existing draft request from My Requests and click Edit).
- Fill in the request header details, select your supplier in Vendor, and optionally select a project in Project.
- In the Line items section, enter your purchase lines with descriptions, quantities, and unit rates.
- Scroll to the Cost codes section beneath the project picker.
- For each line item, select the appropriate cost code from the dropdown menu (defaults to No cost code).
- Complete any supporting document uploads and click Submit request.
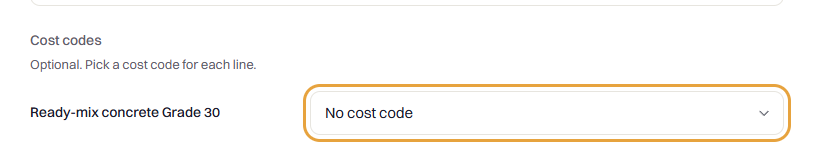
Note: Cost code tagging is optional. All roles that can raise purchase requests (Requester, Manager, Director, Finance, Admin, and Global Admin) can tag lines to active cost codes. If a line was previously tagged to a code that was later archived, Bilaro displays Archived code (kept) so historical records remain intact.
How to view spend by cost code
- Open Cost code spend from the sidebar under Money & Approvals (
/cost-code-spend). If you do not see Cost code spend in the sidebar, your company does not have this module; ask your Admin or Bilaro support. - To narrow the report by date, enter start and end dates in From and To. Click Clear filters at any time to reset.
- Review the three summary metric cards:
- Total spend: Sum of all purchase order line spend within the selected date range.
- Without a cost code: Total spend on lines that were not assigned a cost code.
- Share without a cost code: Percentage of total spend that remains uncoded.
- Review the breakdown table (or stacked cards on mobile screens) showing Code, Description, number of Lines, number of Requests, and total Spend.
- Check the Uncoded row at the bottom of the table to review purchases raised without cost codes.
- Click Export CSV in the top-right corner to download a spreadsheet copy of the spend summary.
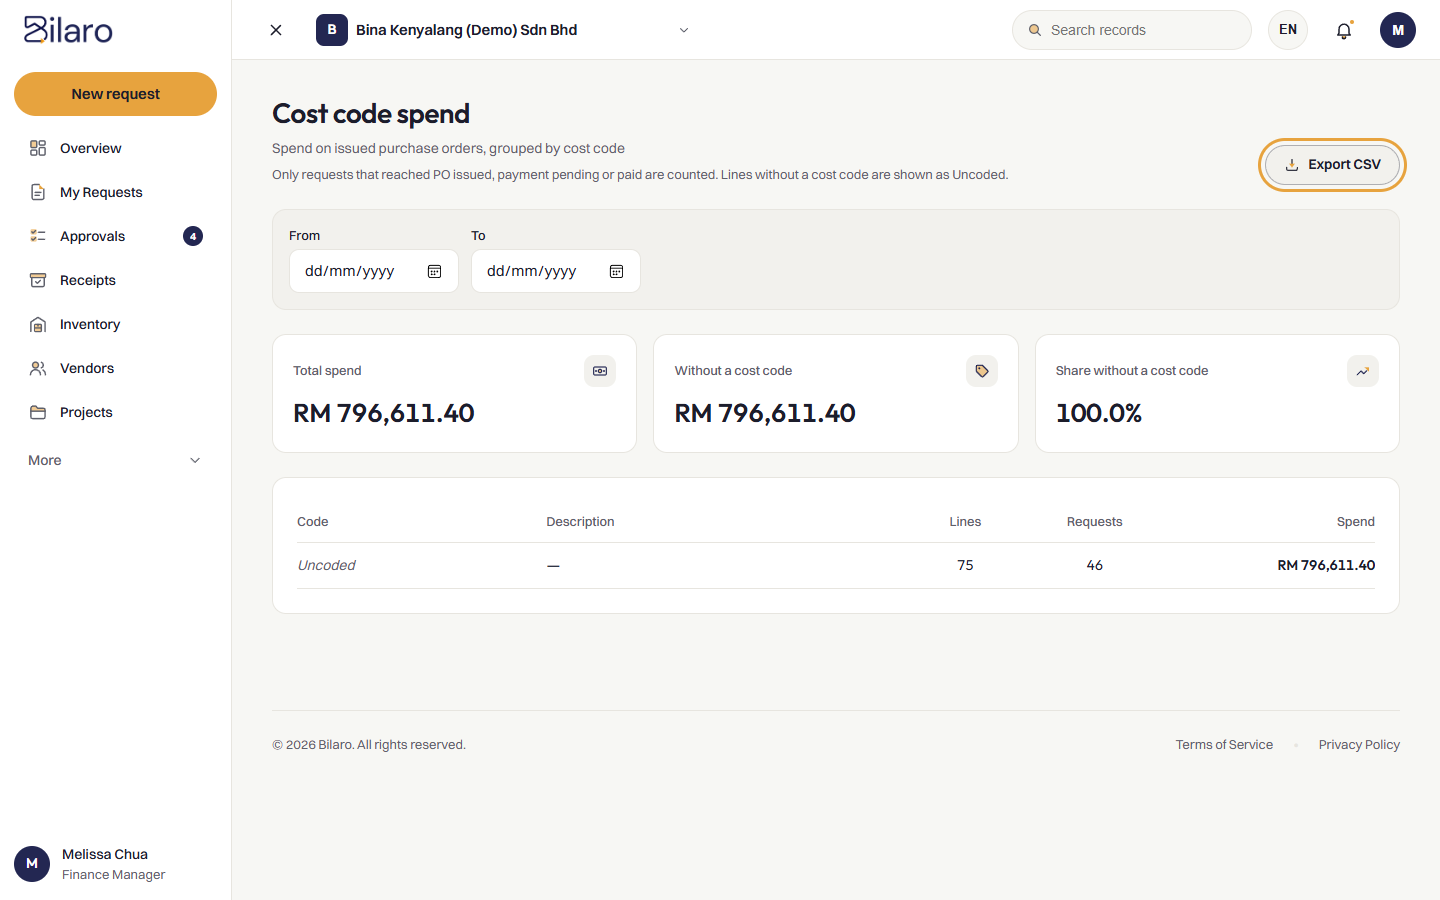
Note: The report counts only purchase requests that have advanced to PO issued, Pending payment, or Paid. Drafts and requests waiting for approval are excluded. Users with Finance, Manager, Director, Admin, and Global Admin roles can access this report.
How to add items to a Bill of Quantities
- Open Projects from the sidebar and click View on the project's card.
- Scroll down to the Bill of Quantities section. If you do not see this section, your company does not have the BQ module; ask your Admin or Bilaro support.
- Click Add item.
- In the dialog, enter the item parameters:
- Item no: Enter the contract reference or bill number (for example,
1.1or6/B1/1.1). - Section: Enter an optional bill heading or trade package (for example,
SubstructureorDrainage). - Description: Enter the full work item description.
- Unit: Enter the bill unit of measurement (for example,
M3,TONNE,M, orNO). - Qty: Enter the planned contract quantity. Fractional quantities (such as
12.5or0.5) are supported. - Rate: Enter the agreed contractual unit rate in RM.
- Lump sum: If the work is priced as a lump sum without a per-unit breakdown, tick this box.
- Amount: Confirm the calculated total or type a manual sum.
- Item no: Enter the contract reference or bill number (for example,
- Click Save.
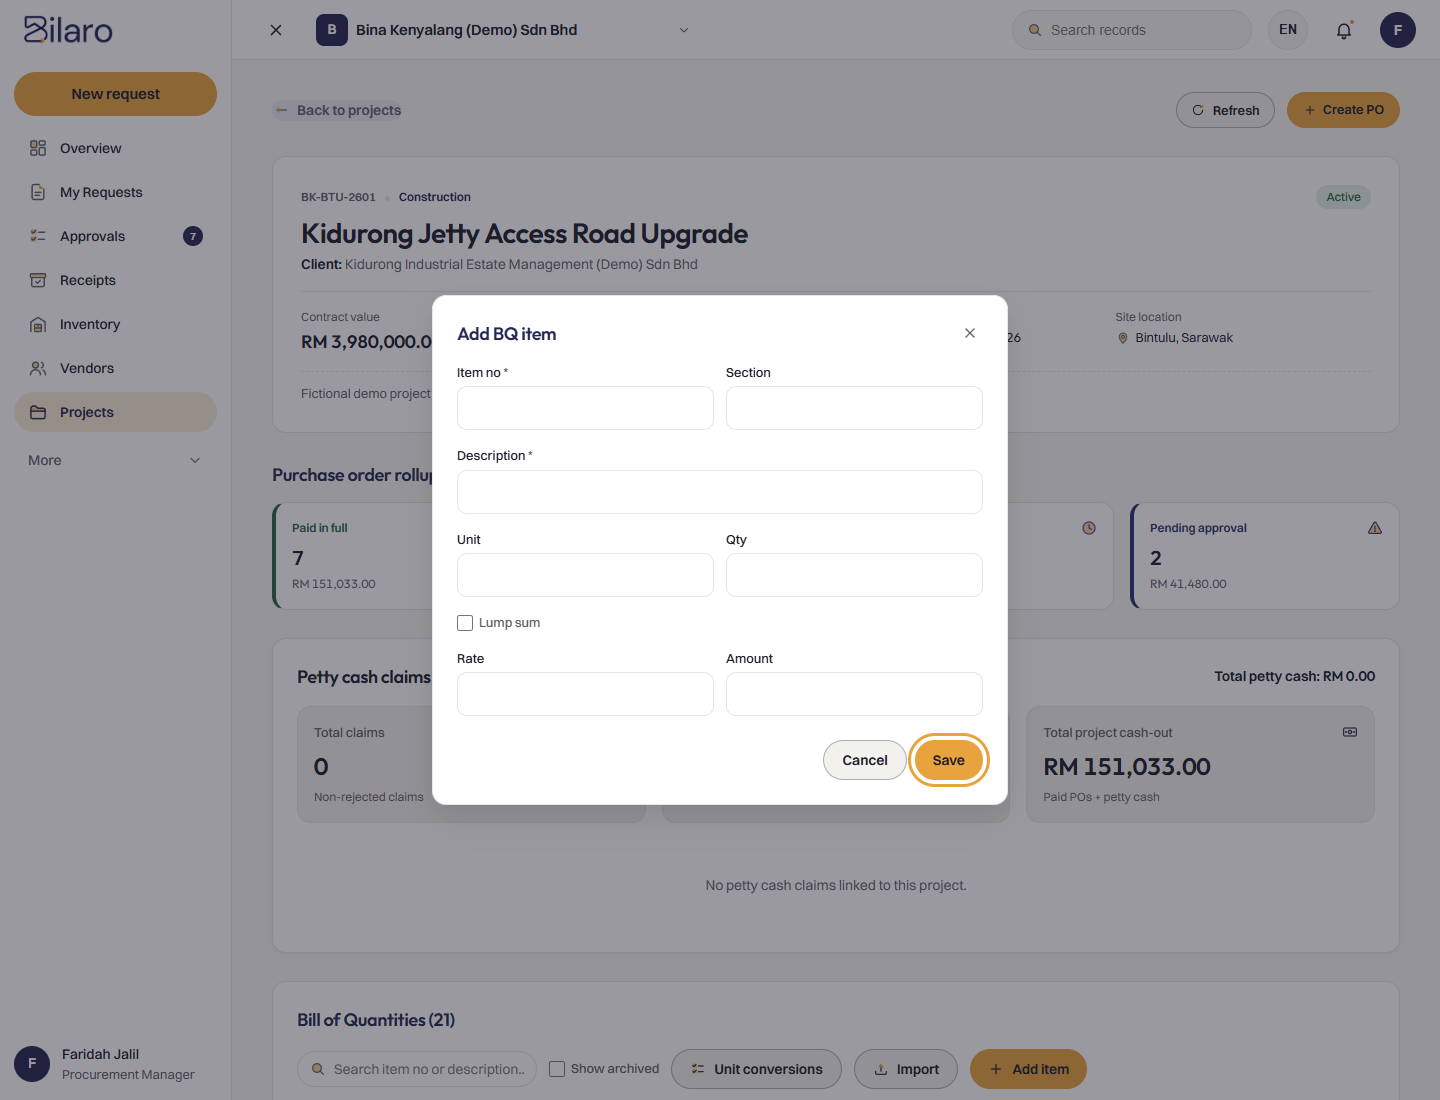
Note: Users with Manager, Director, Finance, Admin, or Global Admin roles can add and edit BQ items. If a project status is changed to Completed or Archived, the Bill of Quantities becomes read-only. Tip: You can permanently delete a BQ item by clicking Delete only if no purchase request lines have been tagged to it. Once lines are tagged, click Archive instead to hide it from selection pickers while preserving historical audit figures.
How to import a Bill of Quantities spreadsheet
- In the project's Bill of Quantities section, click Import.
- To inspect the expected column layout, click Sample CSV or Sample Excel (.xlsx) to download a template workbook.
- Under Choose a .xlsx or .csv file, click to select your spreadsheet (maximum file size 5 MB).
- If your file contains revised rates or quantities for items already in Bilaro, tick Overwrite existing item numbers.
- Click Preview.
- Bilaro scans every bill sheet in the workbook and skips summary sheets automatically.
- If the column headings are non-standard, the Pick the columns mapping tool appears. Select the matching spreadsheet columns for Item no, Description, Unit, Qty, Rate, Amount, and Section, then click Apply and preview again.
- Review the import summary showing valid rows, detected sheets, and any errors.
- Click Confirm import to load the items into your project.
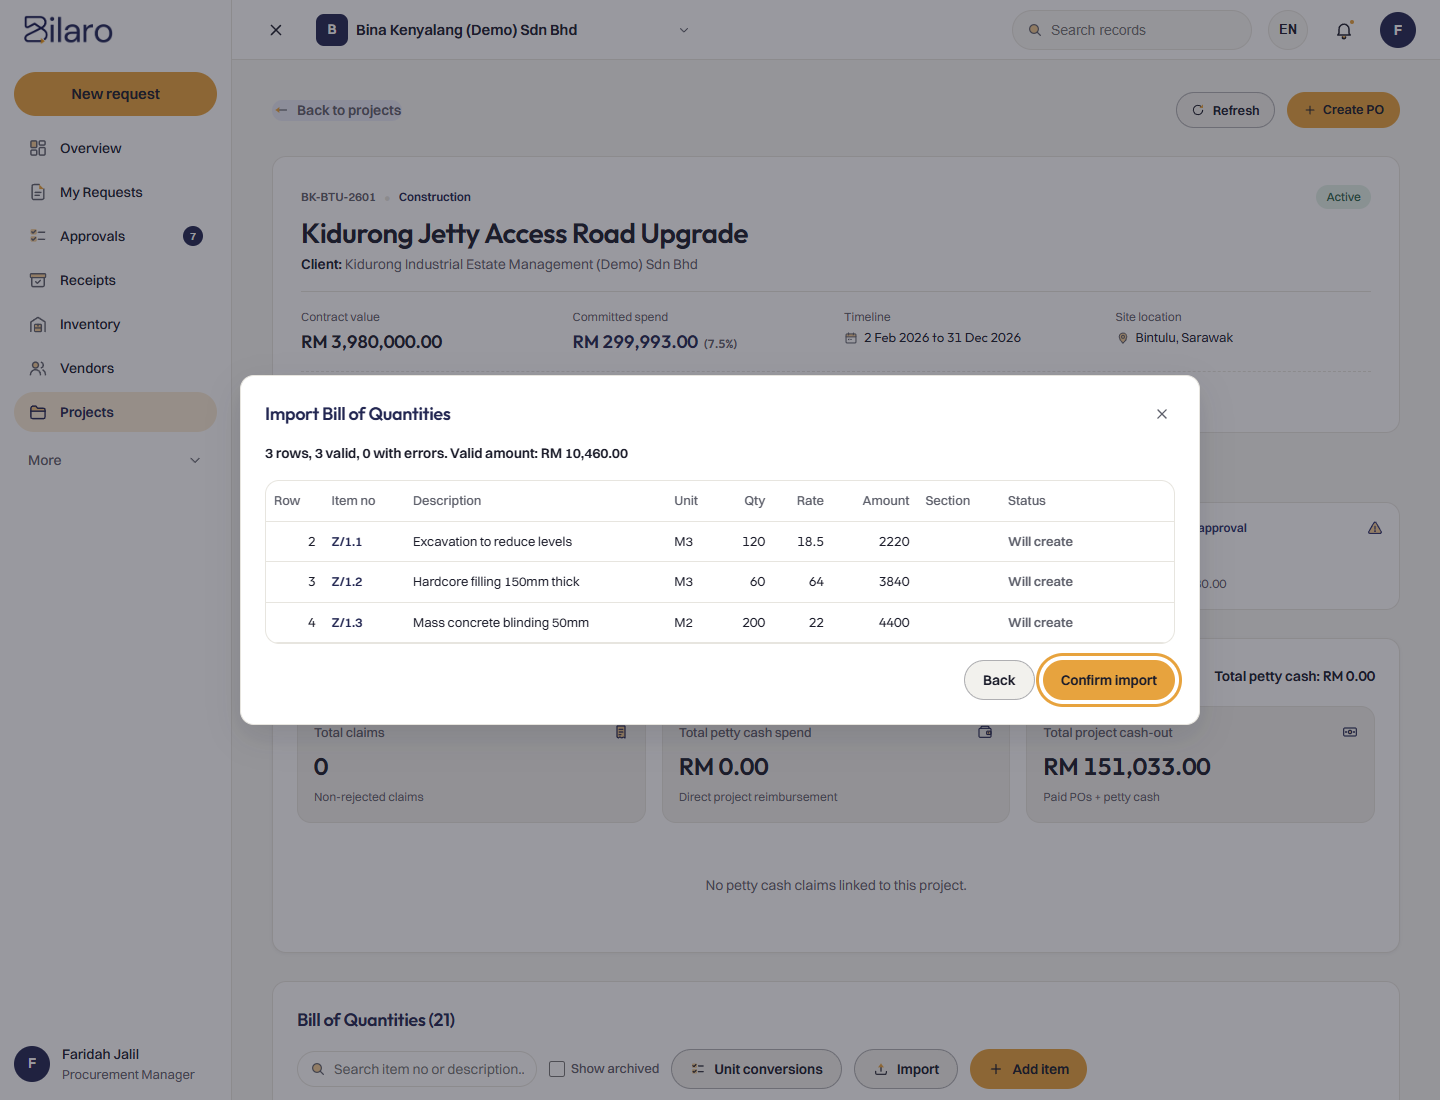
Note: When a BQ spreadsheet has multiple priced columns, Bilaro automatically selects the rightmost pricing column (the Contractor's Proposal) as the allowance amount. Items are numbered by bill, section, and item (for example, 6/B1/1.1).
How to configure BQ unit conversions
- In the project's Bill of Quantities section, click Unit conversions (or open
/bq/conversionsdirectly). - To populate standard reinforcement steel conversion factors, click Load standard rebar weights. Bilaro automatically loads standard weights (bar diameter squared ÷ 162, in kg per metre) for bar diameters Y10 through Y40, R6, and R8.
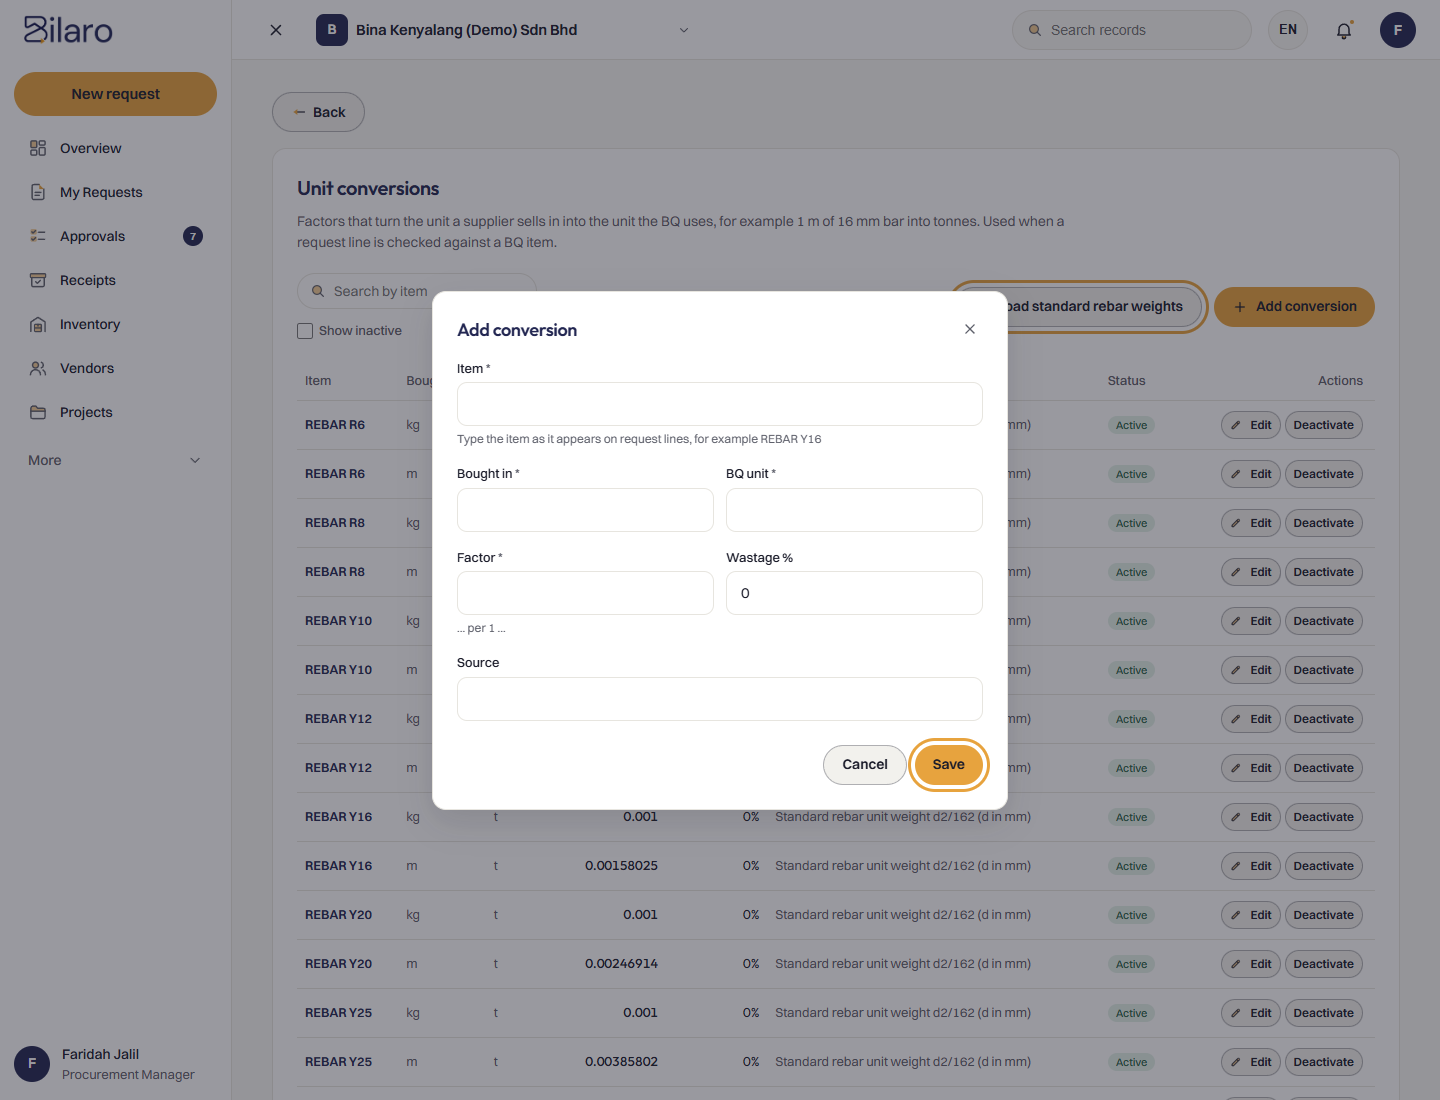
- To set up a custom site conversion (such as crusher run or quarry aggregates sold by the tonne but budgeted in cubic metres), click Add conversion.
- In Item, enter the material identifier as it appears on purchase requests (for example,
CRUSHER RUNorREBAR Y16). - In Bought in, enter the supplier's trading unit (for example,
T). - In BQ unit, enter the contract BQ unit (for example,
M3). - In Factor, enter the conversion multiplier representing BQ units per 1 buying unit (for example,
0.625m³ per 1 tonne). - In Wastage %, enter any expected compaction, cutting, or handling loss (or leave as
0). - In Source, enter reference notes (such as a laboratory test report or quarry density certificate).
- Click Save.
Note: Only Manager, Director, Finance, Admin, and Global Admin roles can add, edit, or deactivate conversion factors. All users can view the conversion list. If a factor changes, click Deactivate rather than deleting it, ensuring previous purchase records maintain their original calculations.
How to allocate request lines to BQ items
- Click New request at the top of the sidebar (or edit an existing draft request from My Requests).
- Select the associated project from the Project dropdown.
- Under Line items, enter the goods or materials being purchased. You can enter fractional quantities (such as
2.5tonnes or0.5days) directly in Qty. - Scroll to the Tag lines to Bill of Quantities (optional) section that appears below the project selector.
- For each line item, click the input labeled Pick a BQ item....
- Search by typing the BQ item number or description.
- Select the matching item from the list. Bilaro displays the item number, description, and the remaining ringgit balance.
- If the item is marked as Lump sum, Bilaro tracks the commitment by total ringgit value without requiring unit conversions.
- Complete your request and click Submit request.
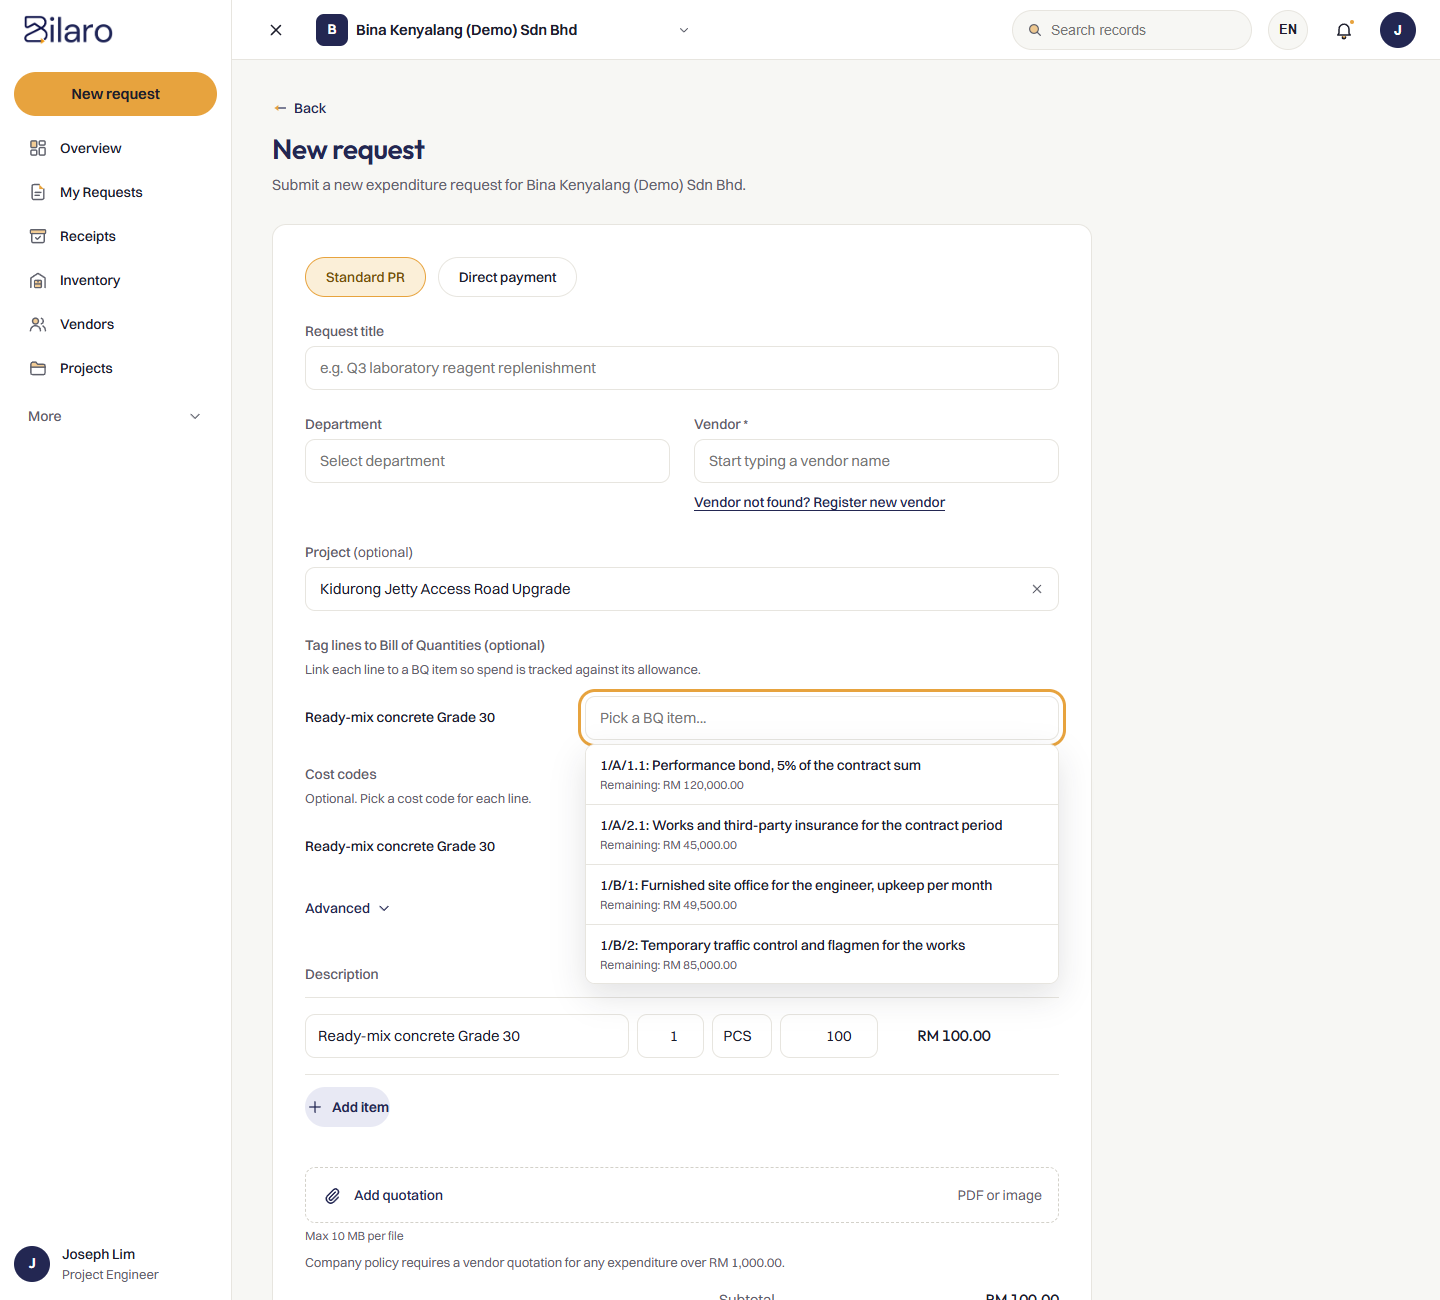
Note: Requesters can only tag lines to active BQ items belonging to the project selected on the request. To unlink a tagged line, click the Clear (x) button beside the selected item.
How to manage BQ overrun warnings and approvals
- When a requester tags a line that causes total project commitments to exceed a BQ item's allowance, Bilaro displays an amber alert banner titled Over the BQ allowance.
- The banner displays the specific overrun details: the item number, the amount in this request, the remaining allowance, and the exact amount over allowance.
- Check your company's BQ overrun policy:
- If your policy is set to Warn, the banner states:
You can still submit. The overrun will be recorded in the audit trail.Requesters can proceed with submission, and approvers see the warning banner during review. - If your policy is set to Director approval, the banner states:
A director must approve this request because of the overrun.When submitted, Bilaro automatically routes the request to a Director for sign-off, even if the total request value is below the company's normal Director approval threshold.
- If your policy is set to Warn, the banner states:
- To configure this policy as an Admin or Global Admin, open Company Settings (
/admin-settings). - Under BQ overrun control, locate the dropdown When a request goes over a BQ item's allowance.
- Select Warn, Director approval, or Off, then click Save BQ overrun policy.

Note: The BQ allowance check accounts for both committed spend on issued purchase orders and pending requests currently progressing through approvals.
How to track procurement savings
- Open Savings report from the sidebar under Home (or expand the More menu if collapsed). If you do not see Savings report, your company does not have the module enabled; ask your Admin or Bilaro support.
- Review the top-level metric cards:
- Total saving: Total ringgit saved across all awarded competitive quotations.
- Saving: Percentage saved relative to the baseline total.
- Baseline total: Total expenditure calculated using baseline prices.
- Awarded total: Actual contracted commitment based on winning supplier quotes.
- RFQs counted: Total number of awarded RFQs contributing to the metrics.
- Items not quoted: Count of requested line items that received no supplier quote or had a zero unit rate.
- To focus on a specific date range, select dates in From and To.
- To view savings for a specific site or contract, select a project in Project (or leave as All projects). Click Clear filters to reset.
- To download the data for executive reporting or spreadsheet reconciliation, click Export CSV.
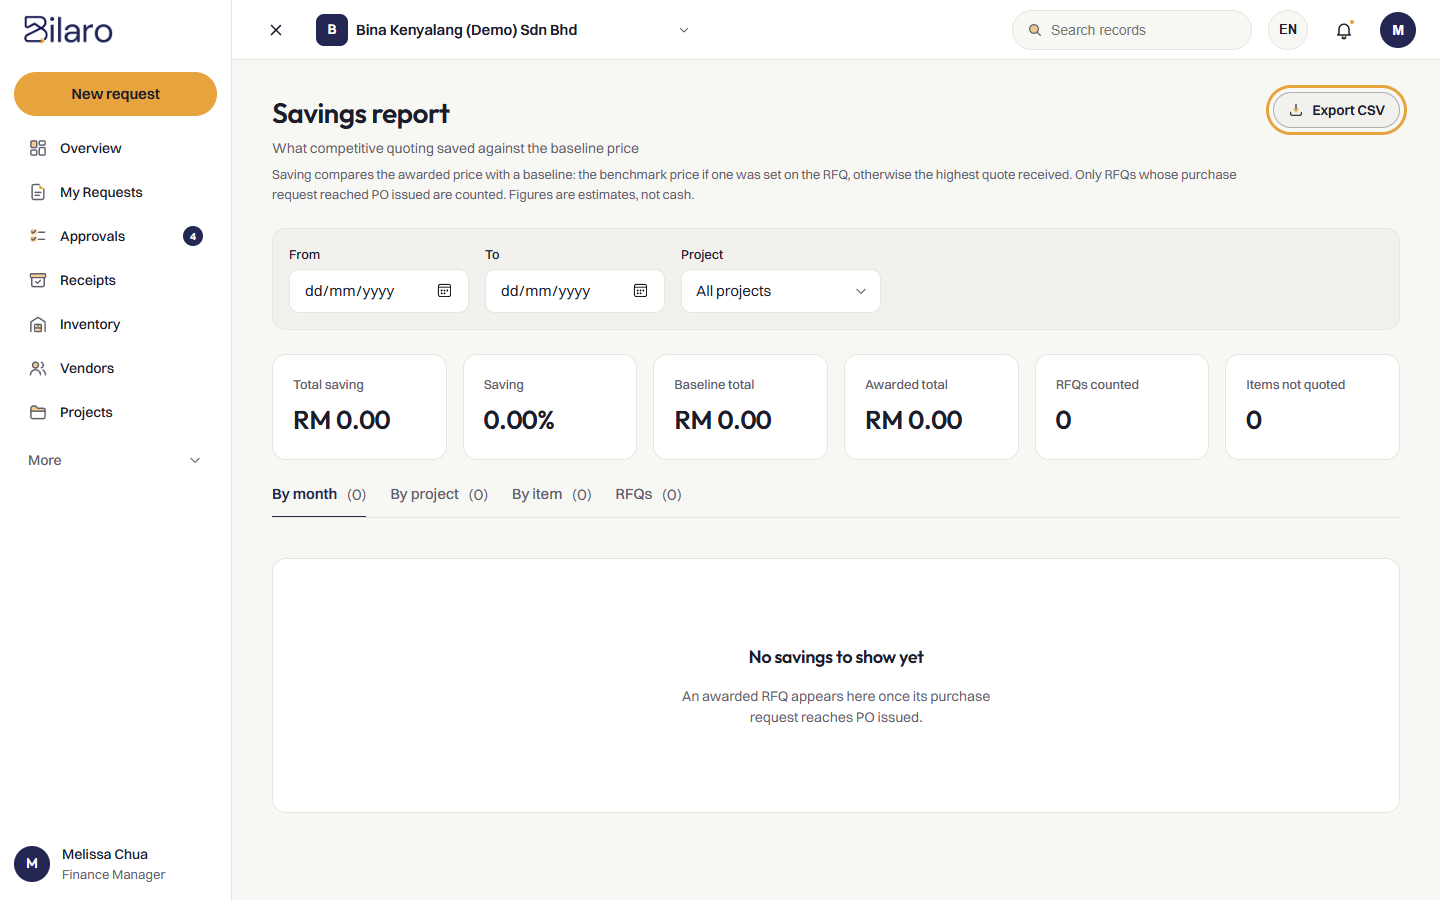
Note: The Savings report measures variance against a baseline: either the preset benchmark unit price entered when creating the RFQ (see the Request for Quotation (RFQ) Guide), or the highest competing quote received from invited vendors. An RFQ appears in this report only after contract award and once its downstream purchase request reaches PO issued, Pending payment, or Paid. Figures are procurement estimates and do not represent realized bank cash.
How to read savings breakdowns
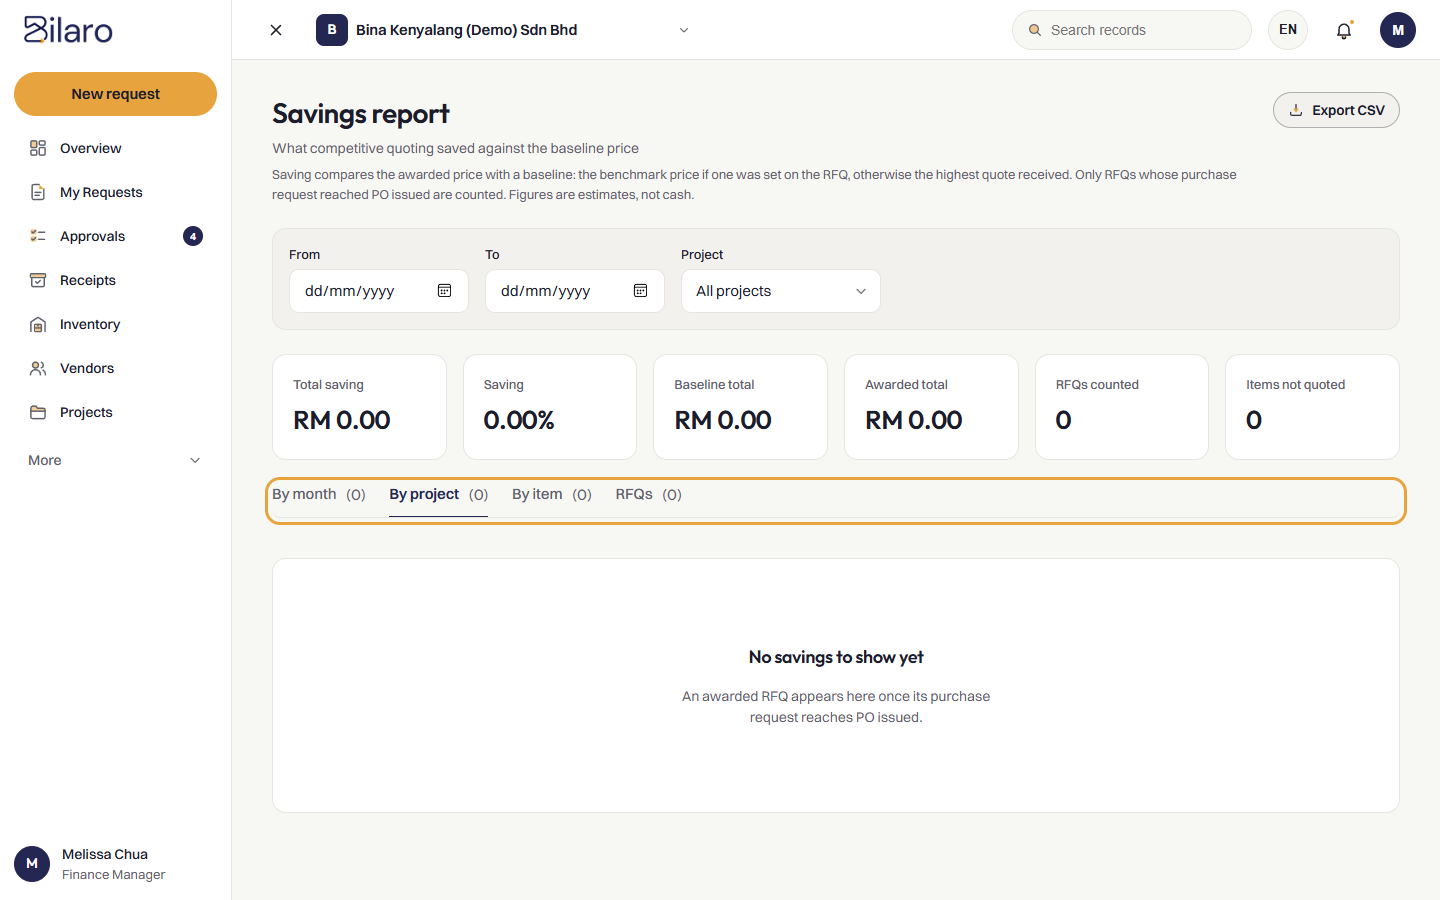
- On the Savings report page, locate the breakdown tab bar beneath the KPI summary cards.
- Click By month to inspect procurement savings grouped by the calendar month when contracts were awarded. The table displays the month name, number of RFQs, Baseline, Awarded, Saving, and Saving %.
- Click By project to evaluate which capital projects or client sites achieved the greatest price reductions. Sourcing packages not tied to a registered project are grouped under Unassigned.
- Click By item to review savings consolidated by purchased item across all RFQs. Review the total contracted Quantity, baseline total, awarded total, and net savings.
- Click RFQs to inspect individual awarded packages. The table lists the sourcing title, supplier name, award date, and totals.
- Click any RFQ row to expand its itemised breakdown. Each line item displays its contracted quantity, winning price, and baseline source (Benchmark price or Highest quote).
Note: If a contract is awarded at a price higher than the preset benchmark, Bilaro displays negative savings in red to highlight the cost premium. Users with Finance, Manager, Director, Admin, and Global Admin roles can view the Savings report.
Need more help? Email support@bilaro.my.