
What are recurring payments and the calendar for?
Recurring payments automate repeating operational costs by creating new draft requests before bills fall due, while the calendar and dashboard track commitments across orders, deliveries, and contract expiries in one unified schedule. Companies use them to keep routine expenses on time and prevent cash-flow surprises or missed delivery dates. For example, a construction site renting an excavator sets up a monthly recurring direct payment for equipment hire, checks the calendar to see when next month's steel rebar delivery and hire instalments are due, and rates the transport supplier once deliveries arrive on site.
How to create a recurring payment
- Click New request at the top of the sidebar.
- In Request type, select Direct payment.
- In Vendor, type the supplier name and select it from the list.
- In Amount (RM), enter the payment amount.
- In Category, select an expense category (such as Utilities, Rent, Software SaaS, Loan instalment, or Payroll (total)).
- In Description or reference, enter account numbers, billing periods, or invoice references.
- In Due date, optionally select the date this first payment must go out.
- Tick the Recurring bill checkbox.
- In Repeats, select the payment frequency: Monthly, Every 3 months, or Yearly.
- Under Amount each time, select either Same amount each time (if the bill is fixed, such as rent) or Amount changes each time (if the bill varies, such as metered utilities).
- Under Ends, select how the schedule terminates:
- Select Never ends for open-ended ongoing expenses.
- Select Ends on a date and enter the Last due date.
- Select Ends after a number of payments and enter the Total number of payments (2 or more, counting this first payment).
- In Create the draft this many days before it is due, enter a lead time from 0 to 30 days to allow time for approval before the payment date.
- Under Supporting documents, click Add quotation to attach the initial invoice, bill, or statement (PDF or image up to 10 MB).
- Click Submit request.
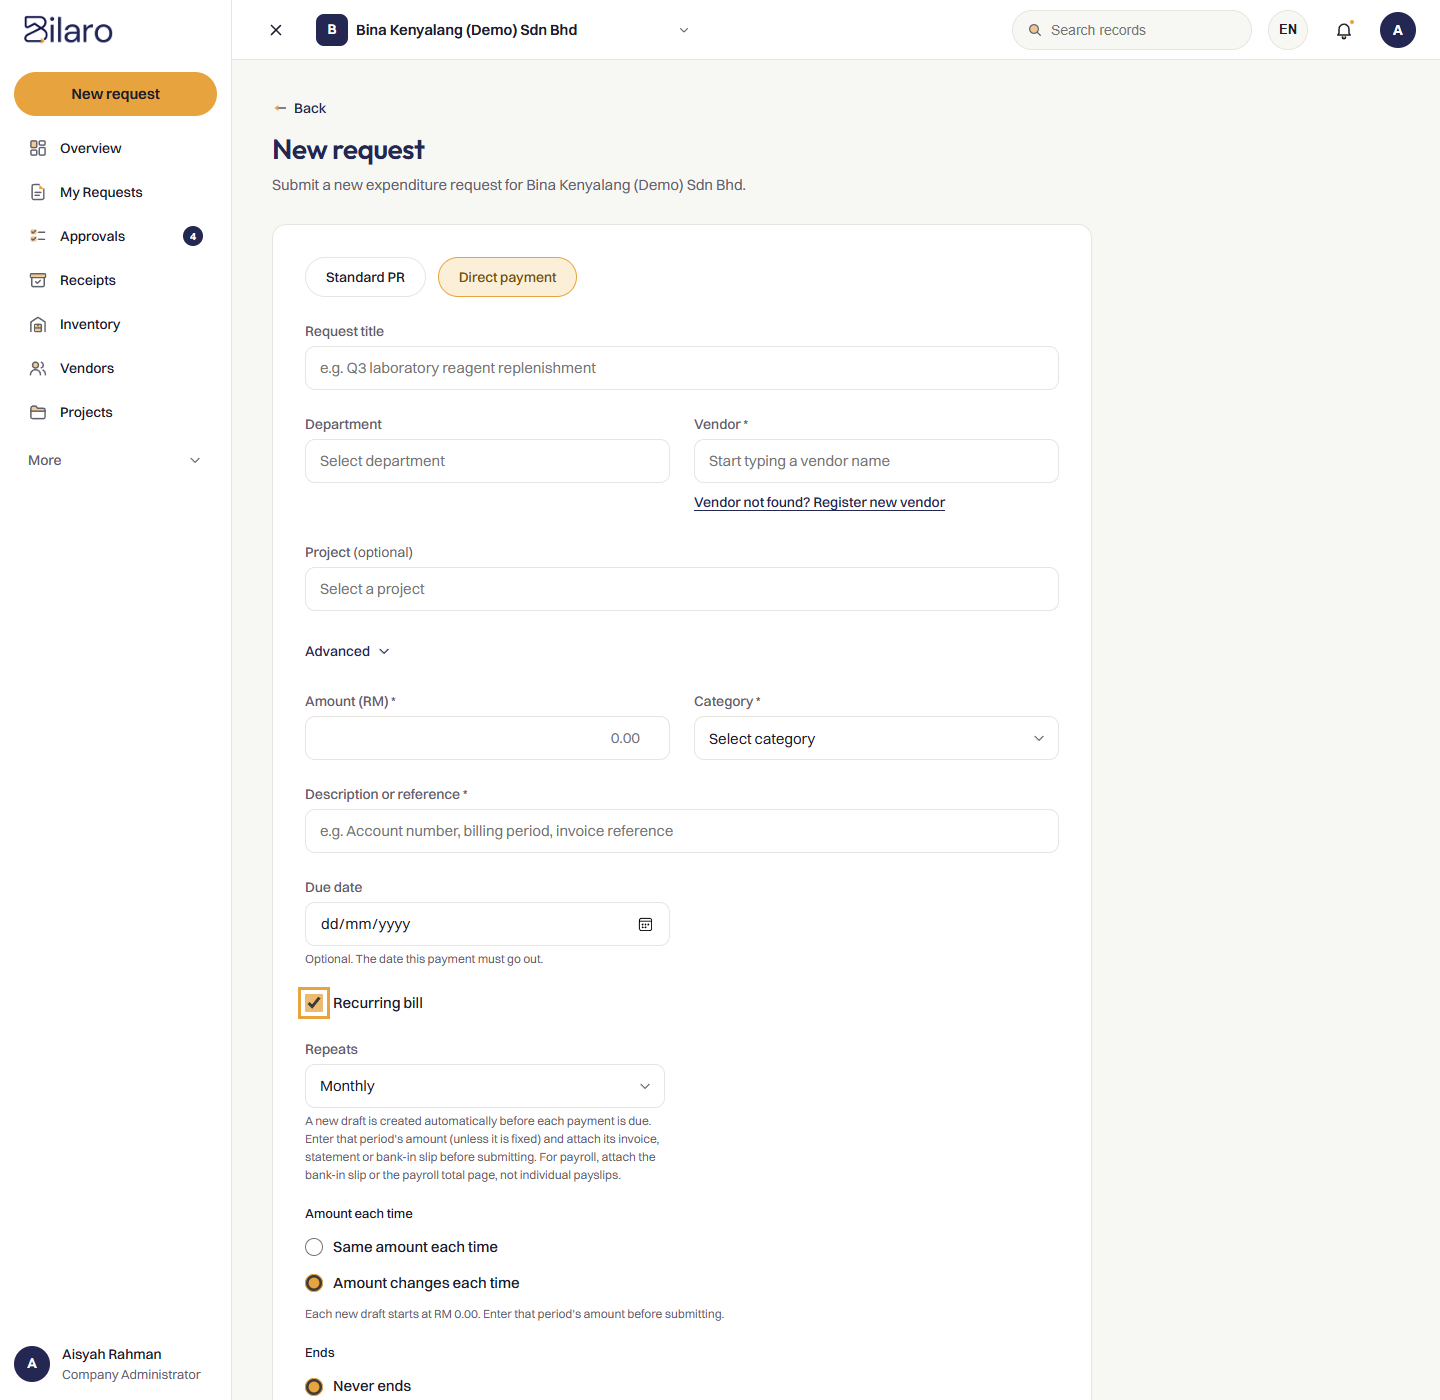
Note: Recurring schedules can be configured only on direct payment requests. When the lead days arrive before each scheduled due date, Bilaro automatically creates a new draft request carrying over the vendor, department, project, category, supporting files, and recurrence schedule. If set to Amount changes each time, the draft opens at RM 0.00 so you can enter that period's amount and attach its current invoice before submitting. Tip: For payroll direct payments, attach the bank-in summary slip or the payroll total page, not individual payslips.
How to edit or stop a recurring schedule
- Open My Requests from the sidebar.
- Select the latest request in the recurring series.
- In the header beneath the request title, locate the Payment schedule card.
- Review the current schedule details: frequency, Next due date, amount rule, end condition, and lead days.
- To change schedule details, click Edit schedule:
- Update the Repeats frequency, Next due date, amount rule, end condition, or lead days.
- Click Save changes.
- To cancel future drafts permanently, click Stop schedule:
- Review the confirmation notice stating that no more drafts will be created and past requests remain unaffected.
- Click Stop schedule.
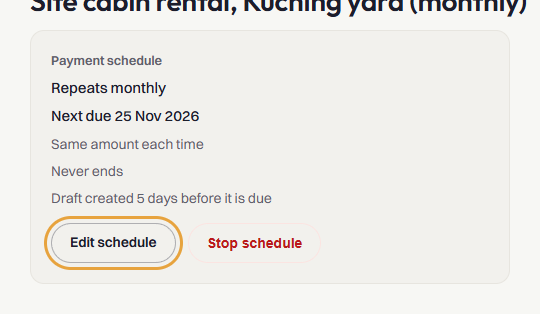
Note: Only an Admin, a Finance user, or the user who created the request can edit or stop the schedule. If a newer draft in the series has already been created, make your edits on that newest request.
How to set or update a payment due date
- Open Overview from the sidebar and find the Coming up card.
- Click Show list to see the items, including those under No due date.
- On the request's row, click Set date.
- In the Set a due date dialog, choose the date and click Save. Bilaro updates the record, logs an audit entry, and recalculates upcoming reminders for the new date.
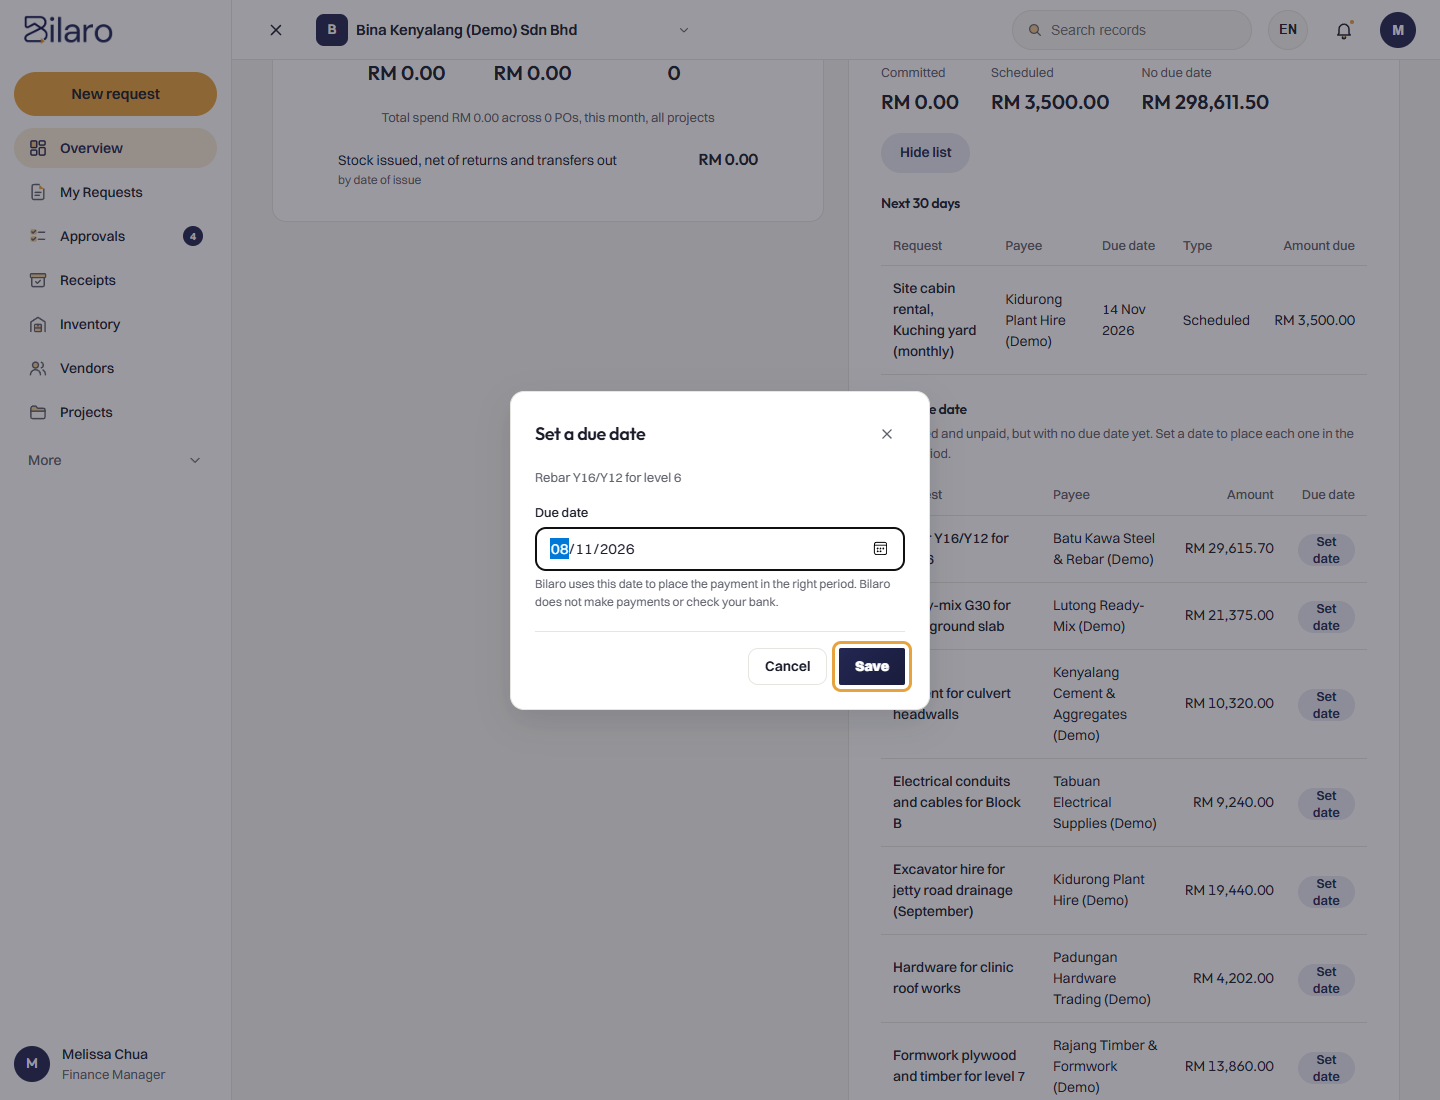
Note: Only users with the Admin or Finance role can set or modify payment due dates. Setting a due date places the request into the appropriate period (Next 30 days, Next 60 days, or Next 90 days) on the dashboard and calendar.
How to monitor cash commitments and upcoming payments
- Open Overview from the sidebar.
- Locate the Coming up card.
- Select an evaluation period: Next 30 days, Next 60 days, or Next 90 days.
- Review the spend totals across categories:
- Committed: Approved purchase orders and direct payments waiting for disbursement within the selected period.
- Scheduled: Fixed recurring drafts and projected upcoming instalments. For variable recurring bills, an Estimate is displayed based on the last recorded amount.
- Overdue: Approved requests whose payment due date has passed.
- No due date: Approved and unpaid requests that have not yet been assigned a due date.
- Click Show list (
) to expand the list of items grouped under Overdue, the active period, and No due date. - Click any request row to navigate directly to that request's details page.
- For items in No due date, click Set date in the table row to assign a due date directly.
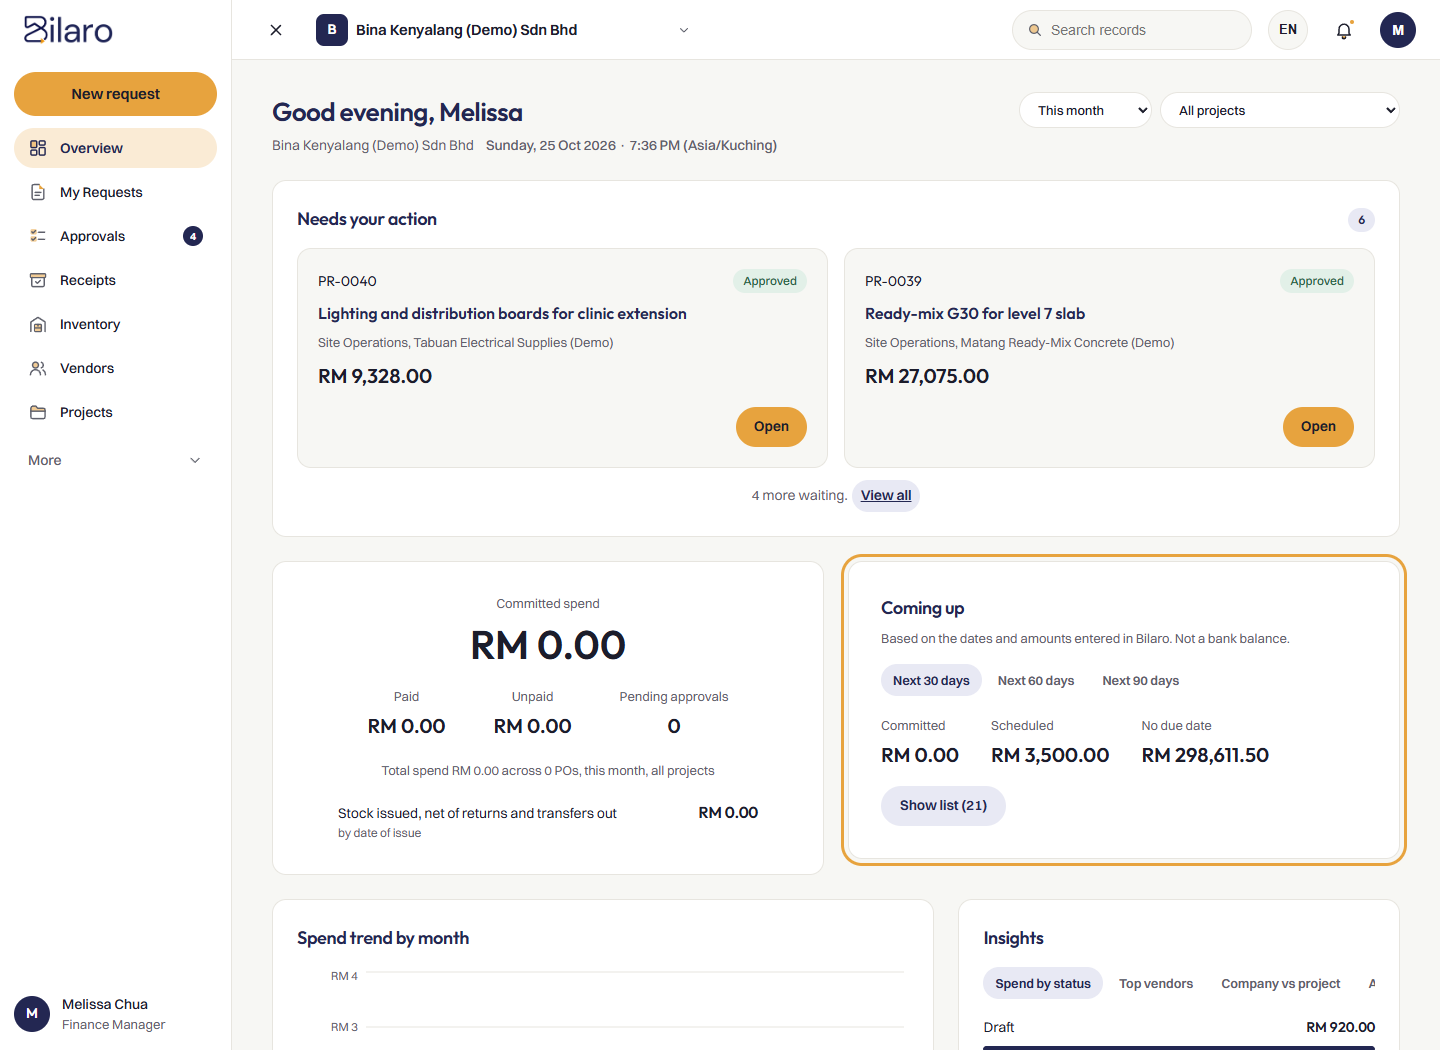
Note: The Coming up card displays figures based on dates entered in Bilaro; it is not a bank balance and does not execute bank transfers or verify live bank balances. The card is accessible to Admin, Director, and Finance roles. Tip: When approving a purchase request, Managers, Directors, Finance officers, and Admins can also inspect the Already committed strip at the top of the decision panel to review commitments for the Next 30 days before approving additional company spend. For more on disbursing and recording payments, see the Finance Guide.
How to use the calendar
- Open Calendar from the sidebar.
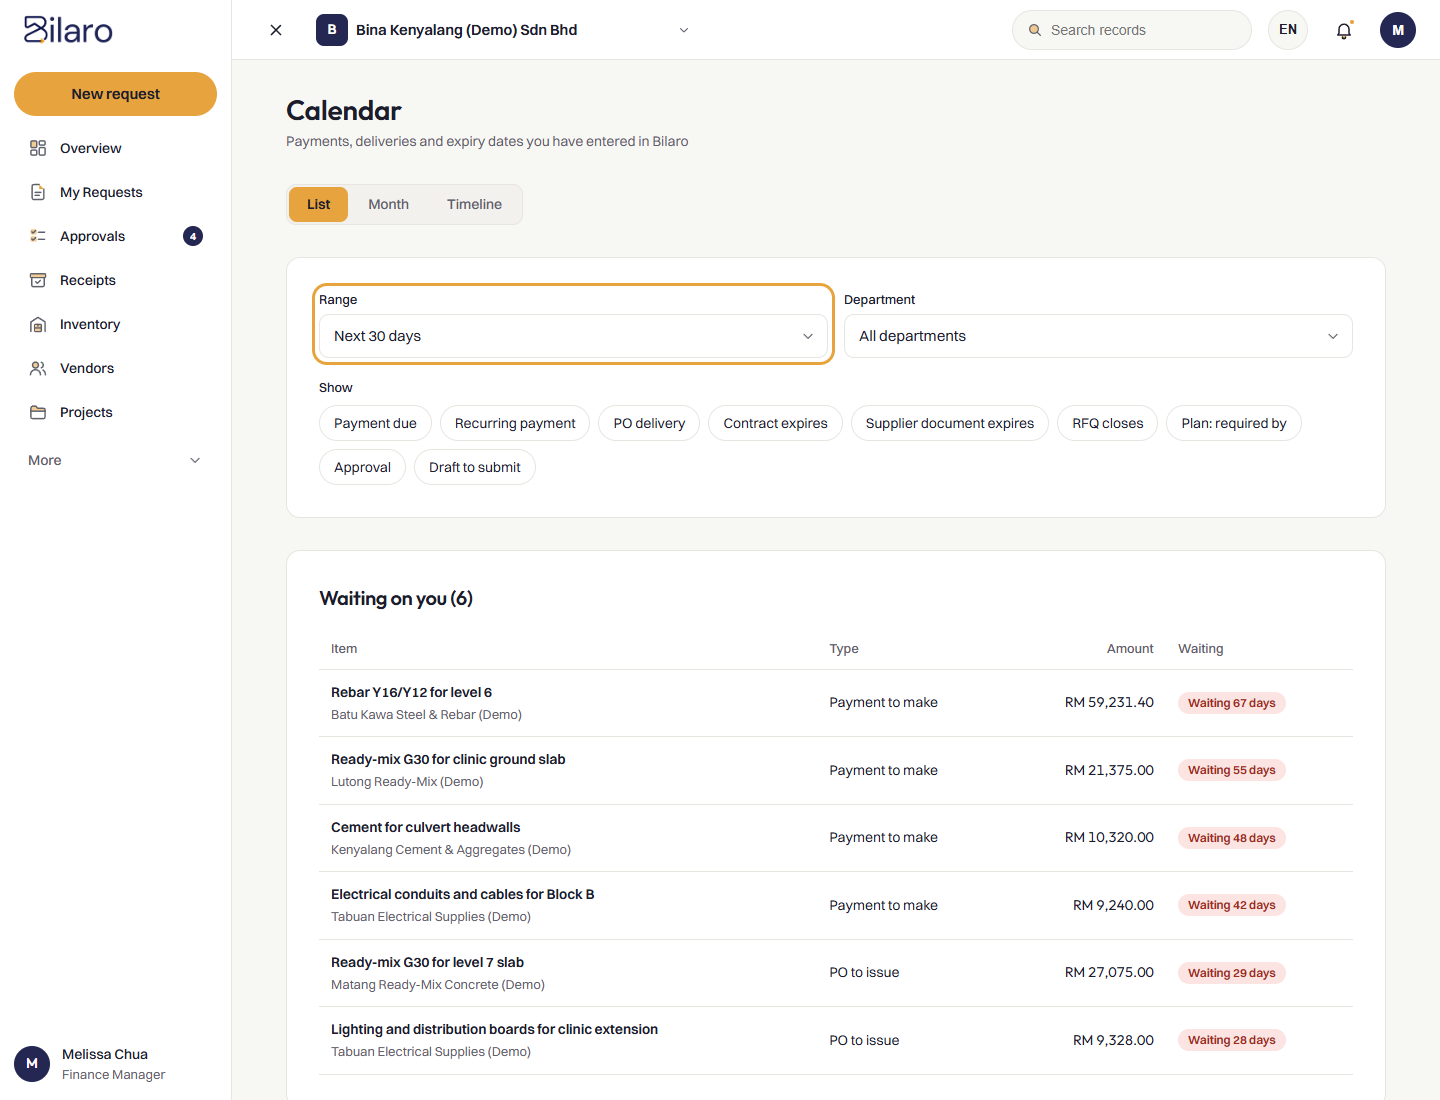
- Ensure List is selected in the Calendar view switcher.
- In Range, choose a time window: Next 7 days, Next 30 days, or Next 90 days.
- In Department, select a specific department to filter items, or choose All departments.
- Click Show to toggle item types on or off (Payment due, Recurring payment, PO delivery, Contract expires, Supplier document expires, RFQ closes, Approval, and Draft to submit).
- Under Waiting on you, review requests awaiting your approval or unsubmitted drafts, noting the aging badge (Waiting X days, highlighted in amber at 3 or more days and coral at 7 or more days).
- Under the date groups (Overdue, Today, Tomorrow, and upcoming calendar dates), review scheduled payments, deliveries, and expiry milestones.
- Click any item row to open the corresponding request, purchase order, RFQ, or contract.
Note: Directors, Finance officers, and Admins see all company payments including payroll and loan lines. For other roles, sensitive payroll and loan figures are excluded from the calendar and totals (Excludes payroll and loan lines) unless the user created the request themselves.
How to view month and timeline views
- Open Calendar from the sidebar.
- In the Calendar view switcher, click Month.
- Use Previous month and Next month to navigate between months, or click Today to return to the current month.
- Review the colour-coded event dots on each calendar day:
- Payment (Green): Approved payment due dates and projected recurring payments.
- PO delivery (Blue): Expected delivery dates on issued purchase orders.
- RFQ deadline (Amber): Quotation submission closing dates.
- Expiry (Red): Vendor registration document expiries (such as CIDB, MOF, or SST certificates) and contract end dates.
- Click any day cell in the monthly grid to see its full item breakdown in the table below the grid.
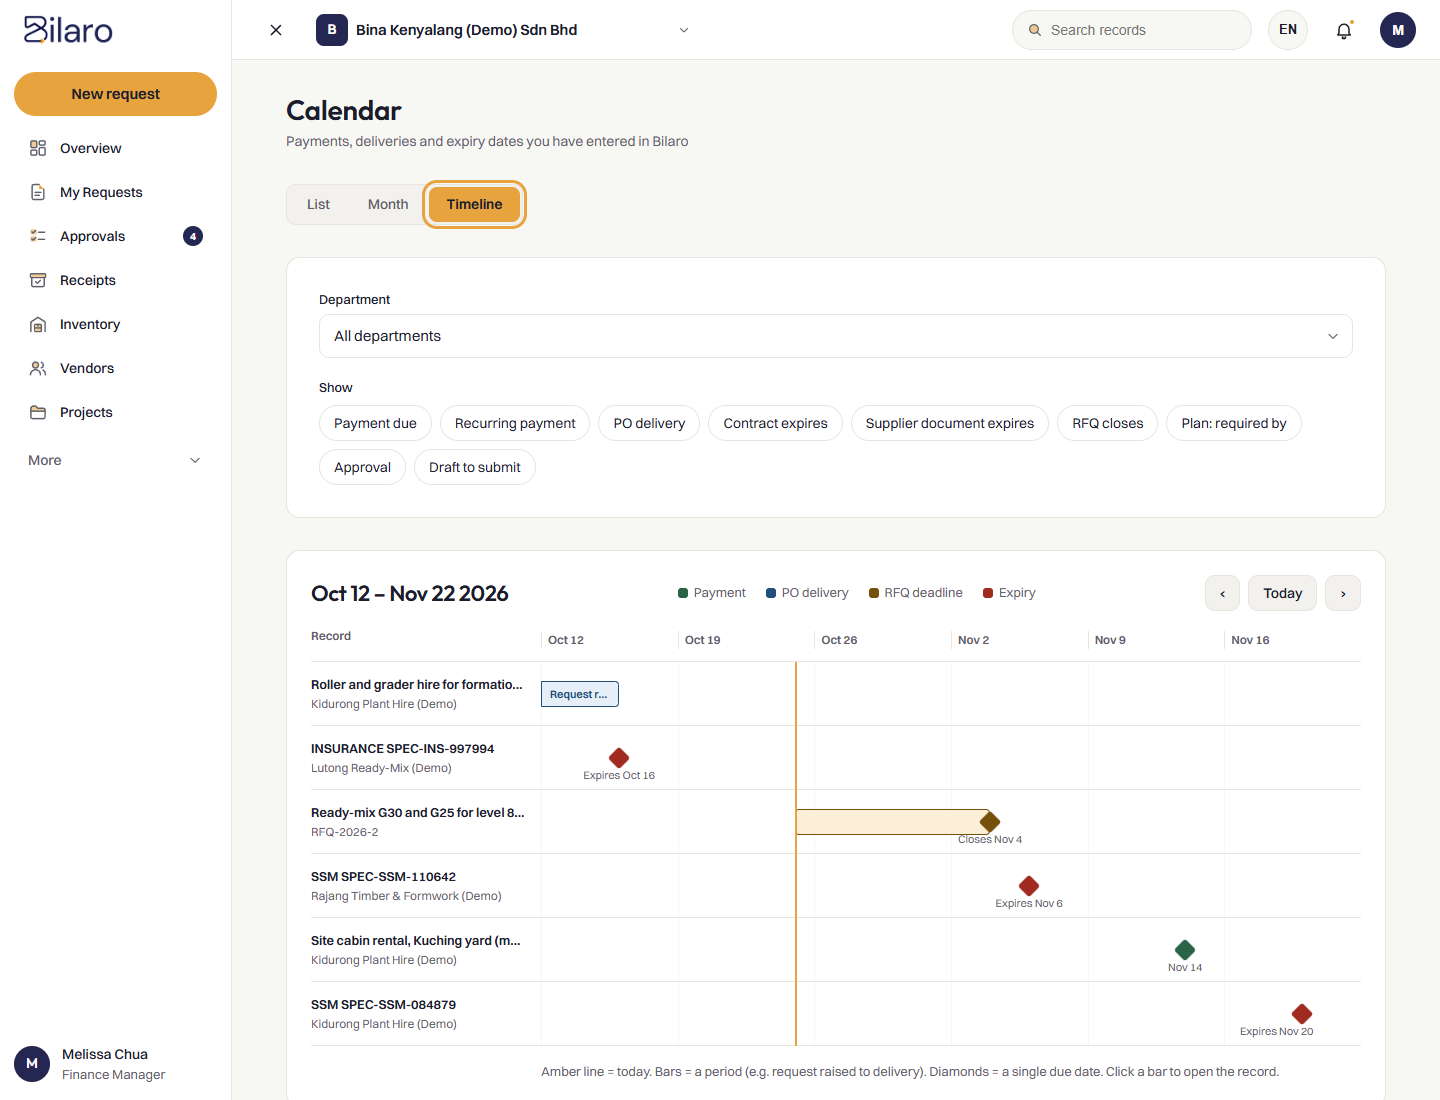
- In the Calendar view switcher, click Timeline to open a 6-week schedule view.
- Review progress bars and milestone markers:
- The vertical amber line marks today's date.
- Blue bar: Request raised → delivery (from request creation to expected delivery).
- Green bar: Delivered → pay by due date (from delivery date to payment due date).
- Amber bar: RFQ duration ending on the closing date (Closes
). - Red bar: Contract duration ending on the expiry date (Expires
). - Green diamond: A single payment due date.
- Click any timeline bar or diamond to open the underlying transaction.
Tip: If you do not see the RFQ closes filter or RFQ deadlines on the calendar, your company doesn't have this module; ask your Admin or Bilaro support. For details on sourcing quotes, see the Request for Quotation Guide.
How to manage due-date reminder emails
- Open Company Settings from the sidebar.
- Under Purchase order settings, locate Due-date reminder emails.
- Tick the checkbox to turn reminder emails on, or untick it to turn them off.
- The setting updates automatically.

Note: Due reminders run as an automated daily background task based on your company timezone. Reminders are triggered at fixed intervals:
- Payments: 7 days before, 1 day before, and 1 day after the due date (when overdue).
- Recurring payment schedules: 7 days before and 1 day before the next scheduled draft date.
- Contract expiries: 30 days before, 7 days before, 1 day before, and 1 day after the expiry date. Admins and Finance users receive email digests covering all company payments, schedules, and contracts. Requesters receive reminder emails for their own requests. In-app notifications continue to be delivered through the notifications bell even when reminder emails are toggled off.
How to submit a supplier review
- Open Vendors from the sidebar.
- Click View on the supplier's row to open the vendor profile panel.
- Scroll down to the Supplier performance reviews section.
- Click Add review.
- In Review period, enter the evaluation period (for example, 2026-Q3 or Oct 2026).
- Rate the supplier across the four criteria using the dropdowns (from 1 out of 5 to 5 out of 5):
- Quality: Material specifications, defect rates, and compliance with standards.
- Delivery: Timeliness of arrival, packaging integrity, and delivery order accuracy.
- Price: Adherence to quoted rates and competitive pricing.
- Service: Communication, site support, and responsiveness to queries or issues.
- In Remarks, enter optional observations, delivery notes, or performance feedback (up to 2,000 characters).
- Click Save review.
- The review is added under Review history, and Bilaro updates the supplier's overall star rating.
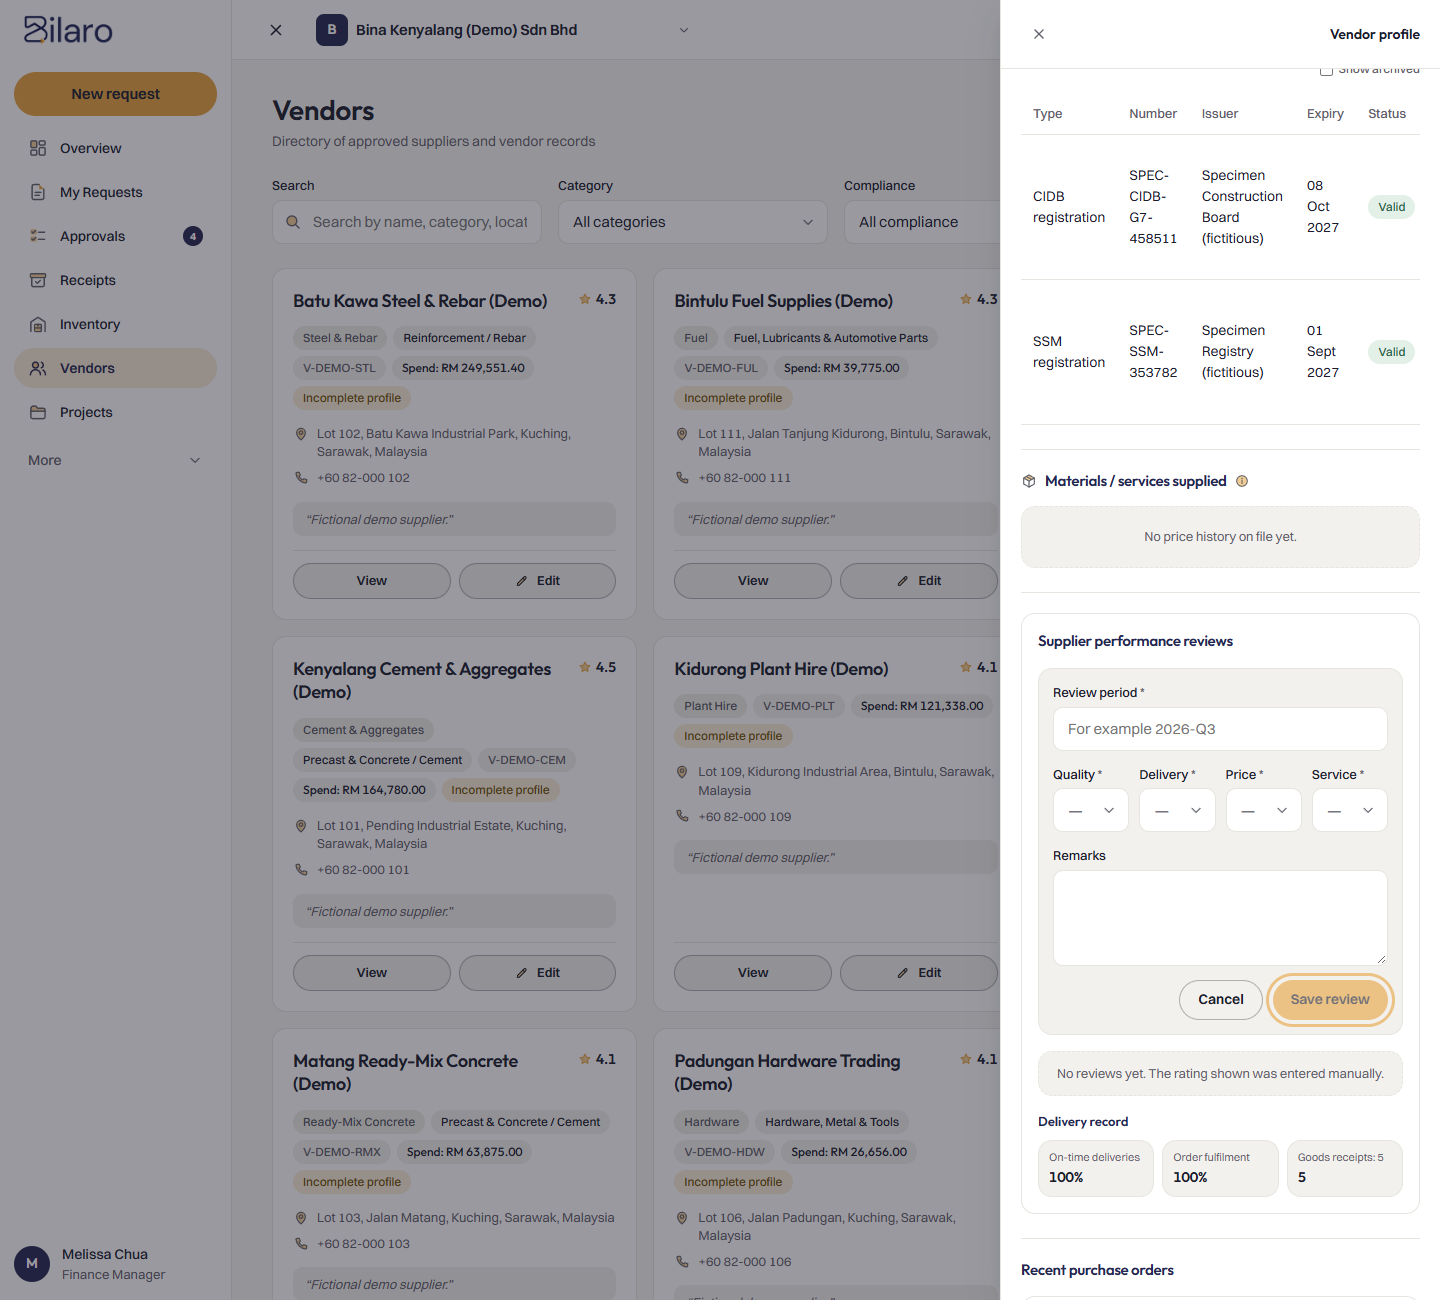
Note: Supplier reviews can be submitted by Finance, Manager, Director, Admin, and Global Admin roles for active vendors. The overall rating on the supplier's profile is automatically derived from the unweighted average of all submitted reviews. In addition, Bilaro displays an objective Delivery record card calculated directly from verified goods receipts (GRNs), showing On-time deliveries percentage, Order fulfilment rate, and total goods receipt counts. If you don't see Supplier performance reviews on the vendor profile, your company doesn't have this module; ask your Admin or Bilaro support.
Need more help? Email support@bilaro.my.